写在前面:为什么要用ElasticSearch?我们的应用经常需要添加检索功能,开源的Elastic Search是目前全文检索引擎的首选。它可以快速的存储、搜索和分析海量数据。
ElasticSearch是一个分布式搜索框架,提供RestfulAPI,底层基于Lucene,采用多shard(分片)的方式保证数据安全,并且提供自动resharding的功能。
Elasticsearch: 权威指南(中文):
https://www.elastic.co/guide/cn/elasticsearch/guide/current/index.html
一、拉取ElasticSearch镜像
在centos窗口中,执行如下命令:
docker pull elasticsearch:5.6.8
当前ES镜像版本信息:
 {
  "name" : "WlwFyqU",
  "cluster_name" : "elasticsearch",
  "cluster_uuid" : "78UDZtviQqiWmzmenGpSrQ",
  "version" : {
    "number" : "5.6.8",
    "build_hash" : "cfe3d9f",
    "build_date" : "2018-09-10T20:12:43.732Z",
    "build_snapshot" : false,
    "lucene_version" : "6.6.1"
  },
  "tagline" : "You Know, for Search"
 }
二、创建数据挂在目录,以及配置ElasticSearch集群配置文件,调高JVM线程数限制数量
1.创建数据文件挂载目录,并开放通信端口
在centos窗口中,执行如下操作:
[root@localhost soft]# pwd
/home/soft
[root@localhost soft]# mkdir -p ES/config
[root@localhost soft]# cd  ES
[root@localhost ES]# mkdir data1
[root@localhost ES]# mkdir data2
[root@localhost ES]# mkdir data3
[root@localhost ES]# cd ES/config/
[root@localhost ES]# firewall-cmd --add-port=9300/tcp
success
[root@localhost ES]# firewall-cmd --add-port=9301/tcp
success
[root@localhost ES]# firewall-cmd --add-port=9302/tcp
success
注:如果ELK选的6.X版本的,那么读者需将data1 data2 data3 开启777权限=> chmod 777 data1 data2 data3
2.创建ElasticSearch配置文件
在centos窗口中,使用vim命令分别创建如下文件:es1.yml,es2.yml,es3.yml
es1.yml
cluster.name: elasticsearch-cluster
node.name: es-node1
network.bind_host: 0.0.0.0
network.publish_host: 192.168.9.219
http.port: 9200
transport.tcp.port: 9300
http.cors.enabled: true
http.cors.allow-origin: "*"
node.master: true
node.data: true
discovery.zen.ping.unicast.hosts: ["192.168.9.219:9300","192.168.9.219:9301","192.168.9.219:9302"]
discovery.zen.minimum_master_nodes: 2
es2.yml
cluster.name: elasticsearch-cluster
node.name: es-node2
network.bind_host: 0.0.0.0
network.publish_host: 192.168.9.219
http.port: 9201
transport.tcp.port: 9301
http.cors.enabled: true
http.cors.allow-origin: "*"
node.master: true
node.data: true
discovery.zen.ping.unicast.hosts: ["192.168.9.219:9300","192.168.9.219:9301","192.168.9.219:9302"]
discovery.zen.minimum_master_nodes: 2
es3.yml
cluster.name: elasticsearch-cluster
node.name: es-node3
network.bind_host: 0.0.0.0
network.publish_host: 192.168.9.219
http.port: 9202
transport.tcp.port: 9302
http.cors.enabled: true
http.cors.allow-origin: "*"
node.master: true
node.data: true
discovery.zen.ping.unicast.hosts: ["192.168.9.219:9300","192.168.9.219:9301","192.168.9.219:9302"]
discovery.zen.minimum_master_nodes: 2
注:本机虚拟机ip:192.168.9.219 读者请自行更改
3.调高JVM线程数限制数量
在centos窗口中,修改配置sysctl.conf
vim /etc/sysctl.conf
加入如下内容:
vm.max_map_count=262144
启用配置:
sysctl -p
注:这一步是为了防止启动容器时,报出如下错误:
bootstrap checks failed max virtual memory areas vm.max_map_count [65530] likely too low, increase to at least [262144]
三、启动ElasticSearch集群容器
启动ElasticSearch集群容器
在centos窗口中,执行如下命令:
 docker run -e ES_JAVA_OPTS="-Xms256m -Xmx256m" -d -p 9200:9200 -p 9300:9300 -v /home/soft/ES/config/es1.yml:/usr/share/elasticsearch/config/elasticsearch.yml -v /home/soft/ES/data1:/usr/share/elasticsearch/data --name ES01 elasticsearch:5.6.8

 docker run -e ES_JAVA_OPTS="-Xms256m -Xmx256m" -d -p 9201:9201 -p 9301:9301 -v /home/soft/ES/config/es2.yml:/usr/share/elasticsearch/config/elasticsearch.yml -v /home/soft/ES/data2:/usr/share/elasticsearch/data --name ES02 elasticsearch:5.6.8

 docker run -e ES_JAVA_OPTS="-Xms256m -Xmx256m" -d -p 9202:9202 -p 9302:9302 -v /home/soft/ES/config/es3.yml:/usr/share/elasticsearch/config/elasticsearch.yml -v /home/soft/ES/data3:/usr/share/elasticsearch/data --name ES03 elasticsearch:5.6.8
注:设置-e ES_JAVA_OPTS="-Xms256m -Xmx256m" 是因为/etc/elasticsearch/jvm.options 默认jvm最大最小内存是2G,读者启动容器后 可用docker stats命令查看
四、验证是否搭建成功
1.在浏览器地址栏访问
http://192.168.9.219:9200/_cat/nodes?pretty
查看节点状态
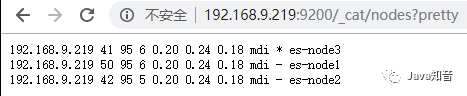
注:节点名称带表示为主节点*
2.使用elasticsearch-head前端框架
1.拉取镜像
docker pull mobz/elasticsearch-head:5
2.启动容器
docker run -d -p 9100:9100 --name es-manager mobz/elasticsearch-head:5
3.浏览器访问http://192.168.9.219:9100/

写在最后,这里要多提一点索引分片设置以及副本,官方推荐设置,读者根据自身需要进行修改:
curl -XPUT ‘http://localhost:9200/_all/_settings?preserve_existing=true’ -d ‘{
“index.number_of_replicas” : “1”,
“index.number_of_shards” : “10”
}’
附录:
1.查看容器内存
docker stats $(docker ps --format={{.Names}})
2.查看容器日志
docker logs 容器名/容器ID
3.ElasticSearch配置文件说明
cluster.name: elasticsearch-cluster
node.name: es-node1
#index.number_of_shards: 2
#index.number_of_replicas: 1
network.bind_host: 0.0.0.0
network.publish_host: 192.168.9.219
http.port: 9200
transport.tcp.port: 9300
http.cors.enabled: true
http.cors.allow-origin: "*"
node.master: true
node.data: true
discovery.zen.ping.unicast.hosts: ["es-node1:9300","es-node2:9301","es-node3:9302"]


