
相关阅读:
吊炸天!74款APP完整源码!
Android-6步教会你自定义View,自定义View就是这么简单
一
摘要:
传统的app开发模式下,线上出现bug,必须通过发布新版本,用户手动更新后才能修复线上bug。那么是否存在一种方案可以在不发版的前提下修复线上bug?有!而且不只一种。今天首先来看下腾讯的Tinker方案
传统的app开发模式下,线上出现bug,必须通过发布新版本,用户手动更新后才能修复线上bug。随着app的业务越来越复杂,代码量爆发式增长,出现bug的机率也随之上升。如果单纯靠发版修复线上bug,其较长的新版覆盖期无疑会对业务造成巨大的伤害,更不要说大型app开发通常涉及多个团队协作,发版排期必须多方协调。
那么是否存在一种方案可以在不发版的前提下修复线上bug?有!而且不只一种,业界各家大厂都针对这一问题拿出了自家的解决方案,较为著名的有腾讯的Tinker和阿里的Andfix。网上对上述方案有很多介绍性文章,不过大多不全面,中间略过很多细节。笔者在学习的过程中也遇到很多麻烦。所以笔者将通过接下来几篇博客对上述两种方案进行介绍,力求不放过每一个细节。首先来看下Tinker方案。
1. Dex分包机制
大家都知道,我们开发的代码在被编译成class文件后会被打包成一个dex文件。但是dex文件有一个限制,由于方法id是一个short类型,所以导致了一个dex文件最多只能存放65536个方法。随着现今App的开发日益复杂,导致方法数早已超过了这个上限。为了解决这个问题,Google提出了multidex方案,即一个apk文件可以包含多个dex文件。
不过值得注意的是,除了第一个dex文件以外,其他的dex文件都是以资源的形式被加载的,换句话说就是在
Application.onCreate()
方法中被注入到系统的
ClassLoader
中的。这也就为热修复提供了一种可能:将修复后的代码达成补丁包,然后发送到客户端,客户端在启动的时候到指定路径下加载对应dex文件即可。
根据Android虚拟机的类加载机制,同一个类只会被加载一次,所以要让修复后的类替换原有的类就必须让补丁包的类被优先加载。接下来看下Android虚拟机的类加载机制。
2. 类加载机制
Android的类加载机制和jvm加载机制类似,都是通过ClassLoader来完成,只是具体的类不同而已:
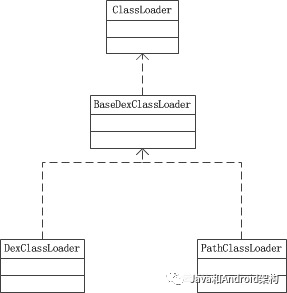
Android系统通过
PathClassLoader
来加载系统类和主dex中的类。而
DexClassLoader
则用于加载其他dex文件中的类。上述两个类都是继承自
BaseDexClassLoader
,具体的加载方法是
findClass
:
public class BaseDexClassLoader extends ClassLoader {
private final DexPathList pathList;
public BaseDexClassLoader(String dexPath, File optimizedDirectory,
String libraryPath, ClassLoader parent) {
super(parent);
this.pathList = new DexPathList(this, dexPath, libraryPath, optimizedDirectory);
}
@Override
protected Class> findClass(String name) throws ClassNotFoundException {
List suppressedExceptions = new ArrayList();
Class c = pathList.findClass(name, suppressedExceptions);
if (c == null) {
ClassNotFoundException cnfe = new ClassNotFoundException("Didn't find class \"" + name + "\" on path: " + pathList);
for (Throwable t : suppressedExceptions) {
cnfe.addSuppressed(t);
}
throw cnfe;
}
return c;
}
}
从代码中可以看到加载类的工作转移到了
pathList
中,
pathList
是一个
DexPathList
类型,从变量名和类型名就可以看出这是一个维护Dex的容器:
final class DexPathList {
private static final String DEX_SUFFIX = ".dex";
private static final String JAR_SUFFIX = ".jar";
private static final String ZIP_SUFFIX = ".zip";
private static final String APK_SUFFIX = ".apk";
private final
ClassLoader definingContext;
private final Element[] dexElements;
public Class findClass(String name, List suppressed) { for (Element element : dexElements) {
DexFile dex = element.dexFile;
if (dex != null) {
Class clazz = dex.loadClassBinaryName(name, definingContext, suppressed);
if (clazz != null) {
return clazz;
}
}
}
if (dexElementsSuppressedExceptions != null) {
suppressed.addAll(Arrays.asList(dexElementsSuppressedExceptions));
}
return null;
}
}
DexPathList
的
findClass
也很简单,
dexElements
是维护dex文件的数组,每一个item对应一个dex文件。
DexPathList
遍历
dexElements
,从每一个dex文件中查找目标类,在找到后即返回并停止遍历。所以要想达到热修复的目的就必须让补丁dex在
dexElements
中的位置先于原有dex:
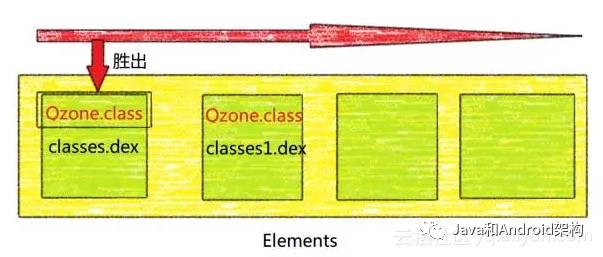
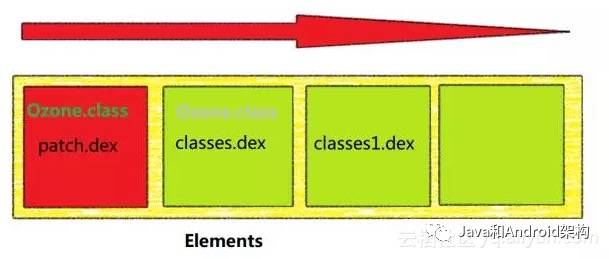
这就是Tinker方案的基本思路,接下来的博文笔者将以一个实际的例子详述Tinker热修复的过程
二
摘要:
Android热修复Tinker方案实战篇。本篇博客我们将介绍1)如何打包补丁包; 2)如何将通过ClassLoader加载补丁包;3)如何将补丁包的dex插入到`dexElements`的前面
接下来我会用一个真实的demo来介绍如何实现热修复。具体的内容包括:
demo很简单,创建一个只有一个Activity的demo:
package com.biyan.demo
public class MainActivity extends Activity {
    private Calculator mCal;    @Override
    protected void onCreate(Bundle savedInstanceState) {
    super.onCreate(savedInstanceState);
        setContentView(R.layout.activity_main);
        mCal = new Calculator();
    }

    public void click(View view) {
        Toast.makeText(this, String.valueOf(mCal.calculate()),Toast.LENGTH_SHORT).show();
    }
}
Public class Caculoator {
    public float calculate() {
        return 1 / 0;
    }
}
demo的代码很简单,运行会出什么bug也很清楚了,在此就不演示了。
首先修复Calculator的bug。
package com.biyan.demo
Public class Caculoator {
    public float calculate() {
        return 1 / 1;
    }
}
重新编译项目,在build目录下找到Calculator.class文件,将其拷出来,准备打包。放置在于Calculator包名相同的路径下。

将其打成jar包:
jar -cvf patch.jar com
然后再将对应的jar包打成dex包:
dx --dex --output=patch_dex.jar patch.jar
dx是讲jar包打成dex包的工具,安装在path-android-sdk/build-tools/version(如24.0.0)/dx。
patch_dex.jar就是补丁包,接下来将其安装在sdCard中,接下来应用从sdCard上加载该补丁包。
3. 加载补丁
根据上一篇博客的介绍,加载补丁的思路如下:
-
在Application的onCreate()方法中获取应用本身的
BaseDexClassLoader
,然后通过反射得到对应的dexElements
-
创建一个新的DexClassLoader实例,然后加载sdCard上的补丁包,然后通过同样的方法得到对应的dexElements
-
将两个dexElements合并,然后再利用反射将合并后的dexElements赋值给应用本身的
BaseDexClassLoader
接下来看下具体代码:
package com.hotpatch.demo;
import android.app.Application;
import


