公众号后台回复“
面试
”,获取精品学习资料

扫描下方海报
了解
专栏详情

本文来源:码洞
数据库分库分表除了使用中间件来代理请求分发之外,另外一种常见的方法就是在客户端层面来分库分表 —— 通过适当地包装客户端代码使得分库分表的数据库访问操作代码编写起来也很方便。
本文的分库分表方案基于 MyBatis 框架,但是又不同于市面上常用的方案,它们一般都是通过编写复杂的 MyBatis 插件来重写 SQL 语句,这样的插件代码会巨复杂无比,可能最终只有插件的原作者自己可以完全吃透相关代码,给项目的维护性带来一定问题。
本文的方案非常简单易懂,而且也不失使用上的便捷性。它的设计哲学来源于 Python —— Explicit is better than Implicit,也就是显式优于隐式,它不会将分库分表的过程隐藏起来。
很多分库分表的设计在实现上会尽量将分库分表的逻辑隐藏起来,其实这是毫无必要的。使用者必须知道背后确实进行了分库分表,否则他怎么会无法进行全局的索引查找?他怎么会无法随意进行多表的 join 操作。如果你真的将它当成单表来用,到上线时必然会出大问题。
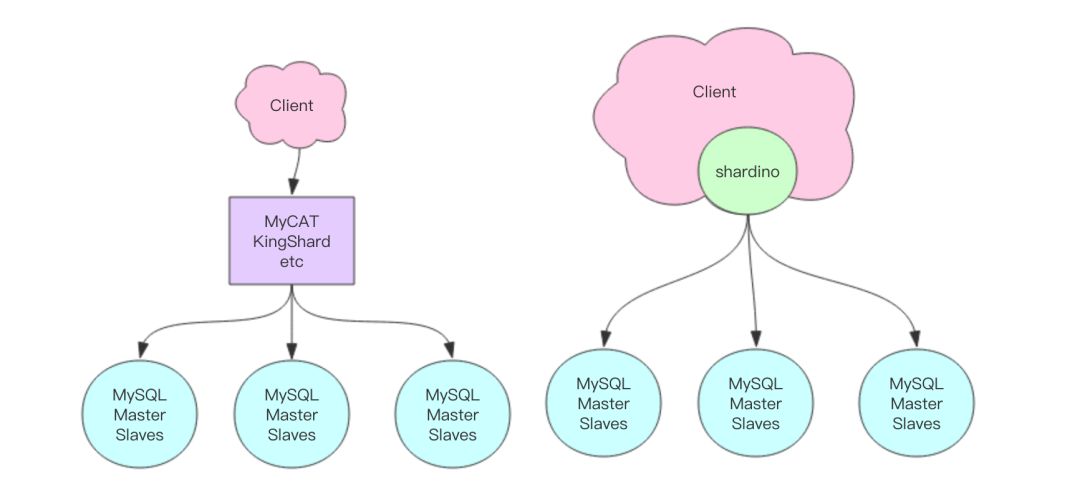
项目名称叫:shardino,项目地址:
https://github.com/pyloque/shardino
接下来我们来看看在本文的方案之下,数据库操作代码的形式是怎样的
帖子表一共分出来 64 个表,不同的记录会各自分发到其中一个表,可以是按 hash 分发,也可以按照日期分发,分发逻辑由用户代码自己来决定。在不同的环境中可以将分表数量设置为不同的值,比如在单元测试下分表设为 4 个,而线上可能需要设置为 64 个。
@Configuration
public class PartitionConfig {

    private int post = 64;

    public int post() {
        return post;
    }

    public void post(int post) {
        this.post = post;
    }
}
帖子表又会被分配到多个库,这里就直接取模分配。假设有 4 个帖子库,帖子表总共分出来 64 个表,分别是 post_0、post_1、post_2 一直到 post_63。那么 post_0、post_4、post_8 等分配到 0 号库,post_1、post_5、post_9 等分配到 1 号库,post_2、post_6、post_10 等分配到 2 号库,post_3、post_5、post_11 等分配到 4 号库。
从配置文件中构建 MySQLGroupStore 数据库组对象,这个对象是我们执行 MySQL 操作的入口,通过它可以找到具体的物理的 MySQL 主从数据源。
@Configuration
public class RepoConfig {
@Autowired
private Environment env;
private MySQLGroupBuilder mysqlGroupBuilder = new MySQLGroupBuilder();
@Bean
@Qualifier("post")
public MySQLGroupStore replyMySQLGroupStore() {
MySQLGroupStore store = mysqlGroupBuilder.buildStore(env, "post");
store.prepare(factory -> {
factory.getConfiguration().addMapper(PostMapper.class);
});
return store;
}
}
配置文件 application.properties 如下
mysql.post0.master.addrWeights=localhost:3306
mysql.post0.master.db=sample
mysql.post0.master.user=sample
mysql.post0.master.password=123456
mysql.post0.master.poolSize=10

mysql.post0.slave.addrWeights=localhost:3307=100&localhost:3308=100
mysql.post0.slave.db=sample
mysql.post0.slave.user=sample
mysql.post0.slave.password=123456
mysql.post0.slave.poolSize=10

mysql.post1.master.addrWeights=localhost:3309
mysql.post1.master.db=sample
mysql.post1.master.user=sample
mysql.post1.master.password=123456
mysql.post1.master.poolSize=10

mysql.post1.slave.addrWeights=localhost:3310=100&localhost:3311=100
mysql.post1.slave.db=sample
mysql.post1.slave.user=sample
mysql.post1.slave.password=123456
mysql.post1.slave.poolSize=10

mysqlgroup.post.nodes=post0,post1
mysqlgroup.post.slaveEnabled=true
这里的数据库组是由多个对等的 Master-Slaves 对构成,每个 Master-Slaves 是由一个主库和多个不同权重的从库构成,Master-Slaves 对的数量就是分库的数量。
mysqlgroup 还有一个特殊的配置选项 slaveEnabled 来控制是否需要从库,从而关闭读写分离,默认是关闭的,这样就不会去构建从库实例相关对象。
post_k 这张表后缀 k 我们称之为 partition number,也就是后续代码中到处在用的 partition 变量,表明当前的记录被分配到对应物理数据表的序号。我们需要根据记录的内容计算出 partition number,再根据 partition number 决定出这条记录所在的物理表属于那个物理数据库,然后对这个物理数据库进行相应的读写操作。
在本例中,帖子表按照 userId 字段 hash 出 64 张表,平均分配到 2 对物理库中,每个物理库包含一个主库和2个从库。
有了 MySQLGroupStore 实例,我们就可以尽情操纵所有数据库了。
@Repository
public class PostMySQL {
@Autowired
private PartitionConfig partitions;
@Autowired
@Qualifier("post")
private MySQLGroupStore mysql;
public
void createTables() {
for (int i = 0; i int k = i;
mysql.master(k).execute(session -> {
PostMapper mapper = session.getMapper(PostMapper.class);
mapper.createTable(k);
});
}
}
public void dropTables() {
for (int i = 0; i int k = i;
mysql.master(k).execute(session -> {
PostMapper mapper = session.getMapper(PostMapper.class);
mapper.dropTable(k);
});
}
}
public Post getPostFromMaster(String userId, String id) {
Holder holder = new Holder<>();
int partition = this.partitionFor(userId);
mysql.master(partition).execute(session -> {
PostMapper mapper = session.getMapper(PostMapper.class);
holder.value(mapper.getPost(partition, id));
});
return holder.value();
}
public Post getPostFromSlave(String userId, String id) {
Holder holder = new Holder<>();
int partition = this.partitionFor(userId);
mysql.slave(partition).execute(session -> {
PostMapper mapper = session.getMapper(PostMapper.class);
holder.value(mapper.getPost(partition, id));
});
return holder.value();
}
public void savePost(Post post) {
int partition = this.partitionFor(post);
mysql.master(partition).execute(session -> {
PostMapper mapper = session.getMapper(PostMapper.class);
Post curPost = mapper.getPost(partition, post.getId());
if (curPost != null) {
mapper.updatePost(partition, post);
} else {
mapper.insertPost(partition, post);
}
});
}
public
void deletePost(String userId, String id) {
int partition = this.partitionFor(userId);
mysql.master(partition).execute(session -> {
PostMapper mapper = session.getMapper(PostMapper.class);
mapper.deletePost(partition, id);
});
}
private int partitionFor(Post post) {
return Post.partitionFor(post.getUserId(), partitions.post());
}
private int partitionFor(String userId) {
return Post.partitionFor(userId, partitions.post());
}
}
从上面的代码中可以看出所有的读写、创建、删除表操作的第一步都是计算出 partition number,然后根据它来选出目标主从库再进一步对目标的数据表进行操作。这里我默认开启了autocommit,所以不需要显式来 session.commit() 了。
mysql.master(partition)
mysql.slave(partition)

// 如果没有分库
mysql.master()
mysql.slave()

// 如果既没有分库也没有读写分离
mysql.db()

// 操作具体的表时要带 partition
mapper.getPost(partition, postId)
mapper.savePost(partition, post)
在对数据表的操作过程中,又需要将具体的 partition number 传递过去,如此 MyBatis 才能知道具体操作的是哪个分表。
public interface PostMapper {
@Update("create table if not exists post_#{partition}(id varchar(128) primary key not null, user_id varchar(1024) not null, title varchar(1024) not null, content text, create_time timestamp not null) engine=innodb")
public void createTable(int partition);
@Update("drop table if exists post_#{partition}")
public void dropTable(int partition);
@Results({@Result(property = "createTime", column = "create_time"),
@Result(property = "userId", column = "user_id")})
@Select("select id, user_id, title, content, create_time from post_#{partition} where id=#{id}")
public Post getPost(@Param("partition") int partition, @Param("id"
) String id);
@Insert("insert into post_#{partition}(id, user_id, title, content, create_time) values(#{p.id}, ${p.userId}, #{p.title}, #{p.content}, #{p.createTime})")
public void insertPost(@Param("partition") int partition, @Param("p") Post post);
@Update("update post_#{partition} set title=#{p.title}, content=#{p.content}, create_time=#{p.createTime} where id=#{p.id}")
public void updatePost(@Param("partition") int partition, @Param("p") Post post);
@Delete("delete from post_#{partition} where id=#{id}")
public void deletePost(@Param("partition") int partition, @Param("id") String id);
}
在每一条数据库操作中都必须带上 partition 参数,你可能会觉得这有点繁琐。但是这也很直观,它明确地告诉我们目前正在操作的是哪一个具体的分表。
在 MyBatis 的注解 Mapper 类中,如果方法含有多个参数,需要使用 @Param 注解进行名称标注,这样才可以在 SQL 语句中直接使用相应的注解名称。否则你得使用默认的变量占位符名称 param0、param1 来表示,这就很不直观。
我们将分表的 hash 算法写在实体类 Post 中,这里使用 CRC32 算法进行 hash。
public class Post {
    private String id;
    private String userId;
    private String title;
    private String content;
    private Date createTime;

    public Post() {}

    public Post(String id, String userId, String title, String content, Date createTime) {
        this.id = id;
        this.userId = userId;
        this.title = title;
        this.content = content;
        this.createTime = createTime;
    }

    public String getId() {
        return id;
    }

    public void setId(String id) {
        this.id = id;
    }

    public String getUserId() {
        return userId;
    }

    public void setUserId(String userId) {
        this.userId = userId;
    }

    public String getTitle() {
        return title;
    }

    public void setTitle(String title) {
        this.title = title;
    }

    public String getContent() {
        return content;
    }

    public void setContent(String content) {
        this.content = content;
    }

    public Date getCreateTime() {
        return createTime;
    }

    public void setCreateTime


