选自arXiv
作者:Anish Athalye
机器之心编译
参与:李泽南
用于识别图片中物体的神经网络可以被精心设计的对抗样本欺骗,而这些在人类看起来没有什么问题的图片是如何产生的呢?最近,来自 OpenAI 的研究者 Anish Athalye 等人撰文介绍了他们使用 TensorFlow 制作「假图片」的方法。
为神经网络加入对抗样本是一个简单而有意义的工作:仔细设计的「扰动」输入可以让神经网络受到分类任务上的挑战。这些对抗样本如果应用到现实世界中可能会导致安全问题,因此非常值得关注。
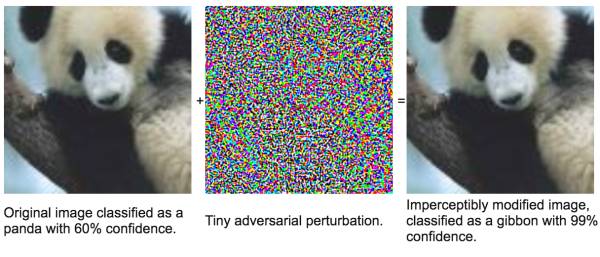
仅仅加入一些特殊的噪点,图像识别系统就会把大熊猫认作是长臂猿——而且是 99% 置信度。想象一下,如果无人驾驶汽车遇到了这种情况……
在本文中,我们将简要介绍用于合成对抗样本的算法,并将演示如何将其应用到 TensorFlow 中,构建稳固对抗样本的方法。
Jupyter notebook 可执行文件:http://www.anishathalye.com/media/2017/07/25/adversarial.ipynb
设置
我们选择攻击用 ImageNet 训练的 Inception v3 模型。在这一节里,我们会从 TF-slim 图像分类库中加载一个预训练的神经网络。
import tensorflow as tf
import tensorflow.contrib.slim as slim
import tensorflow.contrib.slim.nets as nets
tf.logging.set_verbosity(tf.logging.ERROR)
sess = tf.InteractiveSession()
首先,我们需要设置一张输入图片。我们使用 tf.Variable 而非 tf.placeholder 是因为我们会需要让数据可被训练,这样我们就可以在需要时继续输入。
image = tf.Variable(tf.zeros((299, 299, 3)))
随后,我们加载 Inception v3 模型。
def inception(image, reuse):
preprocessed = tf.multiply(tf.subtract(tf.expand_dims(image, 0), 0.5), 2.0)
arg_scope = nets.inception.inception_v3_arg_scope(weight_decay=0.0)
with slim.arg_scope(arg_scope):
logits, _ = nets.inception.inception_v3(
preprocessed, 1001, is_training=False, reuse=reuse)
logits = logits[:,1:] # ignore background class
probs = tf.nn.softmax(logits) # probabilities
return logits, probs
logits, probs = inception(image, reuse=False)
接下来,我们加载预训练权重。这种 Inception v3 模型的 top-5 正确率为 93.9%。
import tempfile
from urllib.request import urlretrieve
import tarfile
import
os
data_dir = tempfile.mkdtemp()
inception_tarball, _ = urlretrieve(
'http://download.tensorflow.org/models/inception_v3_2016_08_28.tar.gz')
tarfile.open(inception_tarball, 'r:gz').extractall(data_dir)
restore_vars = [
var for var in tf.global_variables()
if var.name.startswith('InceptionV3/')
]
saver
= tf.train.Saver(restore_vars)
saver.restore(sess, os.path.join(data_dir, 'inception_v3.ckpt'))
接下来,我们编写代码来显示一张图片,对其进行分类,并显示分类结果。
import json
import matplotlib.pyplot as plt
imagenet_json, _ = urlretrieve(
'http://www.anishathalye.com/media/2017/07/25/imagenet.json')
with open(imagenet_json) as f:
imagenet_labels = json.load(
f)
def classify(img, correct_class=None, target_class=None):
fig, (ax1, ax2) = plt.subplots(1, 2, figsize=(10, 8))
fig.sca(ax1)
p = sess.run(probs, feed_dict={image: img})[0]
ax1.imshow(img)
fig.sca(ax1)
topk = list(p.argsort()[-10:][::-1])
topprobs = p[topk]
barlist = ax2.bar(range(10), topprobs)
if target_class in topk:
barlist[topk.index(target_class)].set_color('r')
if correct_class in topk:
barlist[topk
.index(correct_class)].set_color('g')
plt.sca(ax2)
plt.ylim([0, 1.1])
plt.xticks(range(10),
[imagenet_labels[i][:15] for i in topk],
rotation='vertical')
fig.subplots_adjust(bottom=0.2)
plt.show()
示例图片
我们加载示例图片,并确认它们已被正确分类。
import PIL
import numpy as np
img_path, _ = urlretrieve('http://www.anishathalye.com/media/2017/07/25/cat.jpg')
img_class = 281
img = PIL.Image.open(img_path)
big_dim = max(img.width
, img.height)
wide = img.width > img.height
new_w = 299 if not wide else int(img.width * 299 / img.height)
new_h = 299 if wide else int(img.height * 299 / img.width)
img = img.resize((new_w, new_h)).crop((0, 0, 299, 299))
img = (np.asarray(img) / 255.0).astype(np.float32)
classify(img, correct_class=img_class


