(点击
上方公众号
,可快速关注)
来源:holynull,
www.gitbook.com/book/holynull/-spring-mvc-apache-shiro-/details
如有好文章投稿,请点击 → 这里了解详情
我们在这里将对一个集成了Spring MVC+Hibernate+Apache Shiro的项目进行了一个简单说明。这个项目将展示如何在Spring MVC 中使用Apache Shiro来构建我们的安全框架。
阅读文章前,您需要做以下准备:
开始
安全管理框架数据结构
首先,我们在mysql数据库中创建schema,命名为shirodemo。我们在创建两个用户shiroDemo@localhost和shiroDemo@%,这里我们将用户的密码简单设置成123456。
然后,我们将项目从git服务器上clone到本地后,我们可以在项目根目录下的resources中发现db.sql文件。这个文件是项目的数据库结构文件,你可以将db.sql导入到数据库shirodemo中。
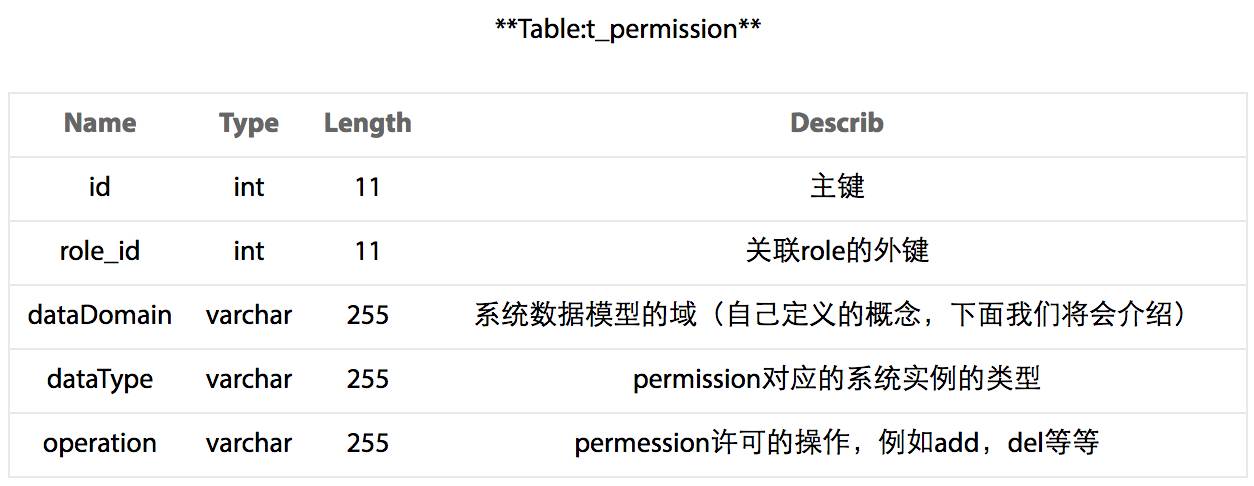
我们这里的权限结构设计比较简单,我们以表格的形式说明主要数据库结构:


t_user和t_role表就不用详细介绍了,就是系统的用户表和角色表。它与t_role角色表的关系是多对多的关系,即一个用户可以有多个角色,一个角色可以包含多个用户。
那么我们介绍一下t_permission表,这个表存放的数据是角色拥有的permission(这里我们就用shiro的permission概念,不翻译了。因为翻译过来是许可,但是许可二字还不能完全阐释permission的概念)。每一个role会对应一个permission,即一对一的关系。
表t_authc_map存储的是Shiro filter需要的配置数据,这些数据组合起来,定义了访问控制(Access Controll)的规则,即定义了哪些url可以被拥有哪些permission或者拥有哪些role的用户访问。在我们这个例子中,其实这张表用处不大。当初设计这样一张表的目的是,能够动态管理访问控制的规则,但是并不能。
提示: 访问控制规则的数据是在Spring bean初始化时就加载给了访问控制的filter。我们试想一下,在你的webapp运行时(runtime),我们可以通过一些手段来修改系统的访问控制规则,那么势必会造成用户提交事务时的处理变得非常复杂。例如,用户正在访问一个url连接,我们通过后台修改了url的访问控制权限,这时这个用户已经提交了一次事务操作,那么怎么判断这次提交是否合法呢?要把这个问题处理清楚就很复杂。那么你可能会问,如果我为系统增加了一个模块,模块中有一些新建的url需要提供给用户访问,但是我不想重启我的应用,直接在数据库中配置完成,怎么办?我想,既然增加了模块,当然需要重新部署,那么仅通过配置数据完成部署,我感觉在现在Spring MVC下,很难实现。所以个人看法,访问控制规则数据使用配置文件还是持久化到数据库,没有什么区别。但是本文中还是会介绍如何将访问控制规则持久化到数据库中。
shiroTest模块
我们可以看见项目中有一个shiroTest模块,这个模块中主要实现在单元测试时,使用的通用程序。在本例中,我们在shiroTest模块中实现一个proxool数据源,为其他模块在单元测试时提供数据库连接。
请注意,我们这里配置的数据源,仅提供给单元测试使用。而我们的webapp中将使用Spring 的JNDI数据源。为什么这么做呢?主要原因是:本例中我们使用的是Tomcat做为中间件,但是实际项目的生产环境,可能使用商业中间件,例如Weblogic等等。那么我们在迁移过程中,就不用考虑中间件使用的是什么数据源,只去调用中间件JNDI上绑定的数据源名称就可以了。而且这些商业中间件一般都有很好的数据源管理功能。如果我们使用独立的数据源,那么数据源就脱离的中间件的管理,岂不是功能浪费?
我们在test中,实现一个测试用例,这个测试用例主要测试数据源的连接:
public void testApp() throws SQLException {
ApplicationContext cxt = new ClassPathXmlApplicationContext(
"classpath*:conf/*-beans.xml");
DataSource ds= (DataSource) cxt.getBean("ds-default");
Connection con=ds.getConnection();
con.close();
assertTrue(true);
}
我们在shiroTest项目根目录下运行mvn test,测试一下。
base模块
base模块主要实现的是整个项目中,各个模块公用的程序。其中包含了:
authmgr模块
authmgr模块实现了如下功能
-
登录
-
登出
-
查询访问控制规则数据
-
实现自定义Realm
-
实现Shiro的SecurityManager
authmgr模块业务接口
我们来看一下接口
com.ultimatech.shirodemo.authmgr.service.IAuthService
public interface IAuthService {
/**
* 用户登录接口
* @param userName 登录用户名
* @param password 密码
* @throws AuthenticationException
*/
void logIn(String userName, String password) throws AuthenticationException;
/**
* 用户登出系统
*/
void logOut();
/**
* 获得数据库中存储的访问控制数据
* @return
*/
List
getFilterChainDefinitions();
}
自定义实现Realm
我们来看一下我们的Realm是如何实现:
com.ultimatech.shirodemo.authmgr.realm.MyRealm
......
@Component("myRealm")
public class MyRealm extends AuthorizingRealm {
@Autowired
public MyRealm(@Qualifier("shiroEncacheManager") CacheManager cacheManager) {
super(cacheManager);
}
@Autowired
private IAuthDao dao;
......
@Override
protected AuthorizationInfo doGetAuthorizationInfo(PrincipalCollection principalCollection) {
//获取登录时输入的用户名
String loginName = (String) principalCollection.fromRealm(getName()).iterator().next();
//到数据库查是否有此对象
User user = this.getDao().findByName(loginName);
if (user != null) {
//权限信息对象info,用来存放查出的用户的所有的角色(role)及权限(permission)
SimpleAuthorizationInfo info = new SimpleAuthorizationInfo();
//用户的角色集合
info.setRoles(user.getRolesName());
//用户的角色对应的所有权限,如果只使用角色定义访问权限,下面的四行可以不要
List
roleList = user.getRoleList();
for (Role role : roleList) {
info.addStringPermissions(role.getPermissionsString());
}
return info;
}
return null;
}
@Override
protected AuthenticationInfo doGetAuthenticationInfo(AuthenticationToken authenticationToken) throws AuthenticationException {
//UsernamePasswordToken对象用来存放提交的登录信息
UsernamePasswordToken token = (UsernamePasswordToken) authenticationToken;
//查出是否有此用户
User user = this.getDao().findByName(token.getUsername());
if (user != null) {
//若存在,将此用户存放到登录认证info中
return new SimpleAuthenticationInfo(user.getUsername(), user.getPassword(), getName());
}
return null;
}
}
Shiro的SecurityManager
我们在Spring 容器中声明一个名叫securityManager的bean。在resources/conf/authmgr-beans.xml中,我们看见如下代码:
由于我们很多模块都会用到共享缓存,所以以上
中的shiroEncacheManager被定义在base模块中。
我们可以去base模块的目录下找到resources/conf/base-beans.xml,找到如下代码:


