2017年的WWDC上,苹果发布了Core ML这个机器学习框架。现在,开发者可以轻松的使用Core ML把机器学习功能集成到自己的应用里,让应用变得更加智能,给用户更牛逼的体验。
Core ML是做什么的
我们知道,机器学习的一个重要应用领域就是事先使用大量数据训练机器,让训练后的机器在面对从未见过的数据时能做出相应的判断。比如,学习大量病人体征数据后,预测疾病发生的概率;学习大量围棋对局后,面对一个陌生的棋局,知道在哪下棋赢的概率更高。
对机器的训练会产生一个关于特定问题的模型,对模型输入特定的数据,模型返回的判断的结果就是输出。Core ML实际做的事情是使用
事先训练好的模型(trained model)
,在本地进行计算,最终返回结果。
应用和Core ML的交互流程大体如图所示:
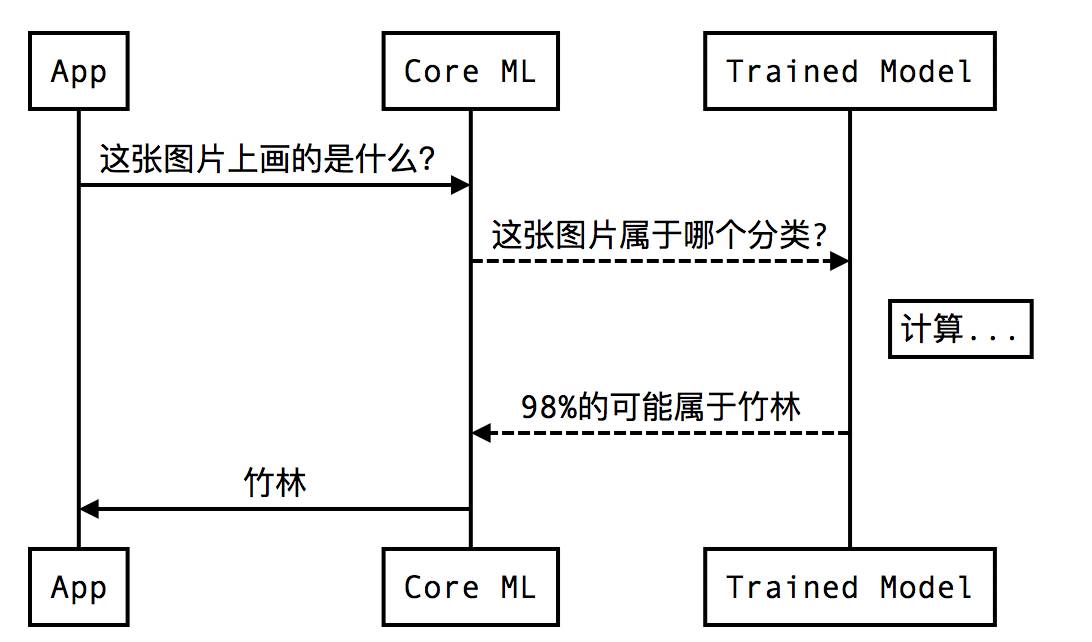
从图上可以看出,真正智能的部分其实是这个
事先训练好的模型(trained model)
,这个模型决定了最终判断的结果。苹果提供了一些转化好的Core ML格式的
模型
,我们也可以通过苹果提供的
工具
把自己在别的常用机器学习工具生成的模型转化为Core ML格式的模型。
集成Core ML
准备工作
-
目前只有Xcode9提供了Core ML支持,所以我们要到
官网
下一个最新版本,或者直接点
这里
下载。
-
我们使用苹果准备好的模型
Places205-GoogLeNet
,到
官网
或者点
这里
下载。
-
Places205-GoogLeNet
用于识别图片里的场景,比如机场航站楼、卧室、森林等。我们要准备一些测试用的图片,我在百度图片用关键字『森林』随便找了下面这个图做测试。
正式开工
1. 添加Core ML框架
在Xcode里打开一个工程。在这里我们创建一个叫
CoreMLDemo
的工程。在
Build Phase
的
Link Binary With Libraries
里,加上
CoreML.framework
。
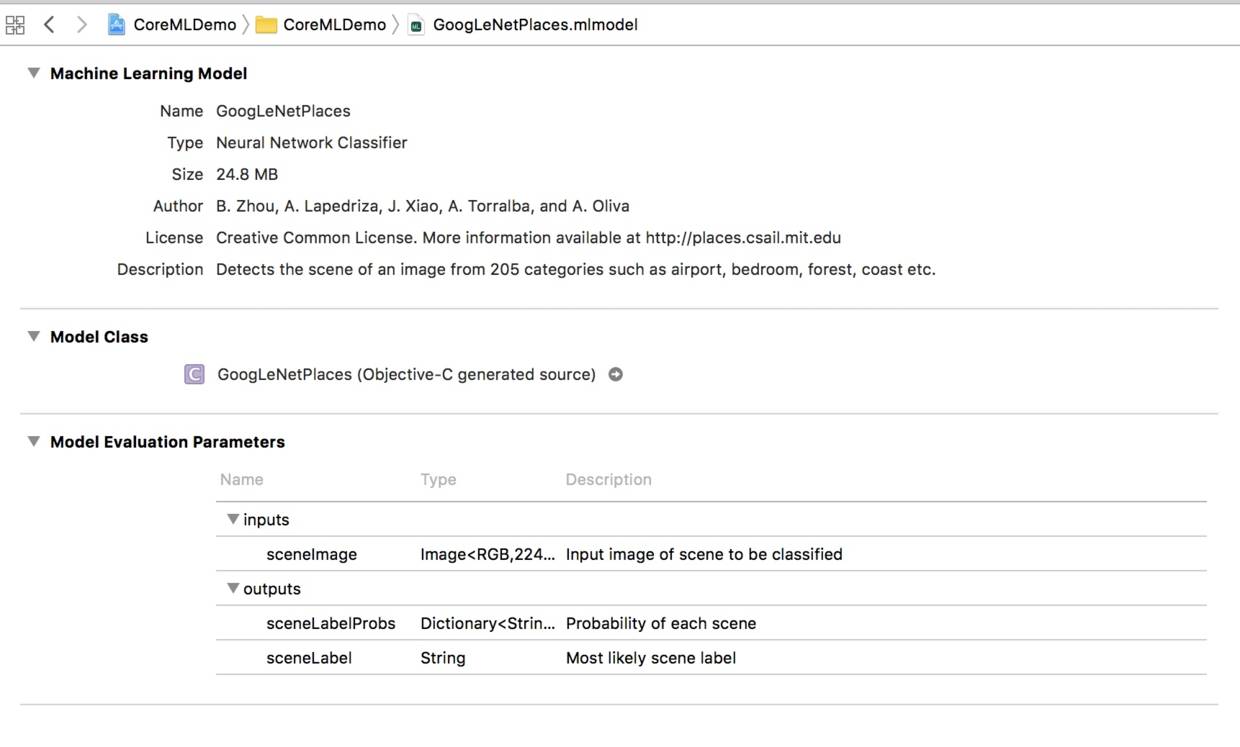
2. 添加模型文件
把之前下载好的模型文件
GoogLeNetPlaces.mlmodel
拖到Xcode里,点击该文件能看到模型的详情。
@interface GoogLeNetPlacesInput : NSObject
/// Input image of scene to be classified as RGB image buffer, 224 pixels wide by 224 pixels high
@property (readwrite, nonatomic) CVPixelBufferRef sceneImage;
- (instancetype)init NS_UNAVAILABLE;
- (instancetype)initWithSceneImage:(CVPixelBufferRef)sceneImage;
@end
/// Model Prediction Output Type
@interface GoogLeNetPlacesOutput : NSObject
/// Probability of each scene as dictionary of strings to doubles
@property (readwrite, nonatomic) NSDictionary
* sceneLabelProbs;
/// Most likely scene label as string value
@property (readwrite, nonatomic) NSString * sceneLabel;
- (instancetype)init NS_UNAVAILABLE;
- (instancetype)initWithSceneLabelProbs:(NSDictionary
*)sceneLabelProbs sceneLabel:(NSString *)sceneLabel;
@end
/// Class for model loading and prediction
@interface GoogLeNetPlaces : NSObject
@property (readonly, nonatomic, nullable) MLModel * model;
- (nullable instancetype)initWithContentsOfURL:(NSURL *)url error:(NSError * _Nullable * _Nullable)error;
/// Make a prediction using the standard interface
/// @param input an instance of GoogLeNetPlacesInput to predict from
/// @param error If an error occurs, upon return contains an NSError object that describes the problem. If you are not interested in possible errors, pass in NULL.
/// @return the prediction as GoogLeNetPlacesOutput
- (nullable GoogLeNetPlacesOutput *)predictionFromFeatures:(GoogLeNetPlacesInput *)input error:(NSError * _Nullable * _Nullable)error;
/// Make a prediction using the convenience interface
/// @param sceneImage Input image of scene to be classified as RGB image buffer, 224 pixels wide by 224 pixels high:
/// @param error If an error occurs, upon return contains an NSError object that describes the problem. If you are not interested in possible errors, pass in NULL.
/// @return the prediction as GoogLeNetPlacesOutput
- (nullable GoogLeNetPlacesOutput *)predictionFromSceneImage:(CVPixelBufferRef)sceneImage error:(NSError * _Nullable * _Nullable)error;
@end
3. 添加Core ML调用代码
把测试图片拖到工程里,找个合适的地方开始写调用Core ML的代码。为了例子简单,我直接写在ViewController里了。
#import "GoogLeNetPlaces.h"
@implementation ViewController
...
- (NSString *)predictImageScene:(UIImage *)image {
GoogLeNetPlaces *model = [[GoogLeNetPlaces alloc] init];
NSError *error;
UIImage *scaledImage = [image scaleToSize:CGSizeMake(224, 224)];
CVPixelBufferRef buffer = [image pixelBufferFromCGImage:scaledImage];
GoogLeNetPlacesInput *input = [[GoogLeNetPlacesInput alloc] initWithSceneImage:buffer];
GoogLeNetPlacesOutput *output = [model predictionFromFeatures:input error:&error];
return output.sceneLabel;
}
...
@end
上面的代码都很简单,就不多解释了。代码里调用了两个给
UIImage
新增的Category里的方法,他们是为了把图片转化成满足
GoogLeNetPlaces
要求的对象,这不是文章的重点,就不多说了,详见
代码
。
找个合适的地方调用上面写的代码:
UIImage *image = [UIImage imageNamed:@"testImage"];
NSString *sceneLabel = [self predictImageScene:image];
NSLog(@"Scene label is: %@", sceneLabel);
完工,运行程序在输出里看结果:
Scene label is: bamboo_forest
虽然上面贴的代码不少,但是实际调用Core ML的只有
predictImageScene
这一个方法里的两行,Core ML的使用已经不能更简单了。不知道是不是输入数据的问题,在测试过程中,我发现
GoogLeNetPlaces
对图片场景的识别还有些问题,具体的还需要进一步研究看看。
对Core ML的调用只是把机器学习集成进iOS的第一步。无论是训练出更准确的模型,还是为用户设计出实际的应用场景,都还有巨大的想象空间,同时也有很长的路要走。
一起努力吧。
Demo的代码我已经上传到
Github
了,有兴趣的同学可以下下来玩玩。如果直接Clone代码到本地用Xcode9打开,可能会出现模型的类文件没生成,提示GoogLeNetPlaces.h文件找不到的情况。这可能是Xcode beta的问题,如果遇到就先自己创建个工程玩吧。
参考资料
Core ML官网
官方文档:Getting a Core ML Model
官方文档:Integrating a Core ML Model into Your App
重要经验八---UIImage转换为CVPixelBufferRef