(点击
上方蓝字
,快速关注我们)
来源: koala bear
wsfdl.com/openstack/2013/10/18/理解nova-api的WSGI框架.html
如有好文章投稿,请点击 → 这里了解详情
本文是
理解 WSGI 框架
的下篇,重点介绍 WSGI 框架下一些常用的 python module,并使用这些 module 编写一个类似 nova-api 里 WSGI 的简单样例,最后分析 nova 是如何使用这些 module 构建其 WSGI 框架。
Eventlet
Eventlet 是一个基于协程的 Python 高并发网络库,和上篇文章所用的 wsgiref 相比,它具有更强大的功能和更好的性能,OpenStack 大量的使用 eventlet 以提供并发能力。它具有以下特点:
Eventlet.wsgi
Eventlet WSGI 简单易用,数行代码即可实现一个基于事件驱动的 WSGI server。本例主要使用了 eventlet.wsgi.server 函数:
eventlet
.
wsgi
.
server
(
sock
,
site
,
log
=
None
,
environ
=
None
,
max_size
=
None
,
max_http_version
=
'HTTP/1.1'
,
protocol
=
eventlet
.
wsgi
.
HttpProtocol
,
server_event
=
None
,
minimum_chunk_size
=
None
,
log_x_forwarded_for
=
True
,
custom_pool
=
None
,
keepalive
=
True
,
log_output
=
True
,
log_format
=
'%(client_ip)s...'
,
url_length_limit
=
8192
,
debug
=
True
,
socket_timeout
=
None
,
capitalize_response_headers
=
True
)
该函数的参数众多,重点介绍以下 2 个参数:
回顾上篇文章内容,本例采用 callable 的 instance 实现一个 WSGI application,利用 eventlet.server 构建 WSGI server,如下:
import eventlet
from eventlet import wsgi
class
AnimalApplication
(
object
)
:
def __init__
(
self
)
:
pass
def __call__
(
self
,
environ
,
start_response
)
:
start_response
(
'200 OK'
,
[(
'Content-Type'
,
'text/plain'
)])
return
[
'This is a animal applicaltion!rn'
]
if
'__main__'
==
__name__
:
application
=
AnimalApplication
()
wsgi
.
server
(
eventlet
.
listen
((
''
,
8080
)),
application
)
Eventlet.spawn
Eventlet.spawn 基于 greenthread,它通过创建一个协程来执行函数,从而提供并发处理能力。
eventlet
.
spawn
(
func
,
*
args
,
**
kw
)
加入该函数后,样例如下:
import eventlet
from eventlet import wsgi
class
AnimalApplication
(
object
)
:
def __init__
(
self
)
:
pass
def __call__
(
self
,
environ
,
start_response
)
:
start_response
(
'200 OK'
,
[(
'Content-Type'
,
'text/plain'
)])
return
[
'This is a animal applicaltion!rn'
]
if
'__main__'
==
__name__
:
application
=
AnimalApplication
()
server
=
eventlet
.
spawn
(
wsgi
.
server
,
eventlet
.
listen
((
''
,
8080
)),
application
)
server
.
wait
()
Paste.deploy
Paste.deploy 是一个用户发现和配置 WSGI server 和 application 的 python 库,它定义简洁的 loadapp 函数,用于从配置文件或者 python egg 中加载 WSGI 应用,它仅关注 application 的入口,不关心 application 的内部细节。
Paste.deploy 通常要求 application 实现一个 factory 的类方法,如下:
import eventlet
from eventlet import wsgi
from
paste
.
deploy import loadapp
class
AnimalApplication
(
object
)
:
def __init__
(
self
)
:
pass
def __call__
(
self
,
environ
,
start_response
)
:
start_response
(
'200 OK'
,
[(
'Content-Type'
,
'text/plain'
)])
return
[
'This is a animal applicaltion!rn'
]
@
classmethod
def factory
(
cls
,
global_conf
,
**
kwargs
)
:
return
cls
()
if
'__main__'
==
__name__
:
application
=
loadapp
(
'config:/path/to/animal.ini'
)
server
=
eventlet
.
spawn
(
wsgi
.
server
,
eventlet
.
listen
((
''
,
8080
)),
application
)
server
.
wait
()
配置文件的规则请参考官网介绍,相应的配置文件如下,其中 app:animal 给出了 application 的入口,pipeline:animal_pipeline 用于配置 WSGI middleware。
[
composite
:
main
]
use
=
egg
:
Paste
#urlmap
/ =
animal
_
pipeline
[
pipeline
:
animal_pipeline
]
pipeline
=
animal
[
app
:
animal
]
paste
.
app_factory
=
animal
:
AnimalApplication
.
factory
现在我们新增一个 IPBlackMiddleware,用于限制某些 IP:
class
IPBlacklistMiddleware
(
object
)
:
def __init__
(
self
,
application
)
:
self
.
application
=
application
def __call__
(
self
,
environ
,
start_response
)
:
ip_addr
=
environ
.
get
(
'HTTP_HOST'
).
split
(
':'
)[
0
]
if
ip_addr
not
in
(
'127.0.0.1'
)
:
start_response
(
'403 Forbidden'
,
[(
'Content-Type'
,
'text/plain'
)])
return
[
'Forbidden'
]
return
self
.
application
(
environ
,
start_response
)
@
classmethod
def factory
(
cls
,
global_conf
,
**
local_conf
)
:
def _factory
(
application
)
:
return
cls
(
application
)
return
_factory
相关配置文件:
[
composite
:
main
]
use
=
egg
:
Paste
#urlmap
/ =
animal
_
pipeline
[
pipeline
:
animal_pipeline
]
pipeline
=
ip_blacklist
animal
[
filter
:
ip_blacklist
]
paste
.
filter_factory
=
animal
:
IPBlacklistMiddleware
.
factory
[
app
:
animal
]
paste
.
app_factory
=
animal
:
AnimalApplication
.
factory
Route
Routes 是基于 ruby on rails 的 routes system 开发的 python 库,它根据 http url 把请求映射到具体的方法,routes 简单易用,可方便的构建 Restful 风格的 url。
本例增加 CatController 和 DogController,对于 url_path 为 cats 的 HTTP 请求,映射到 CatController 处理,对于 url_path 为 dogs 的 HTTP 请求,映射到 DogController 处理,最终样例如下:
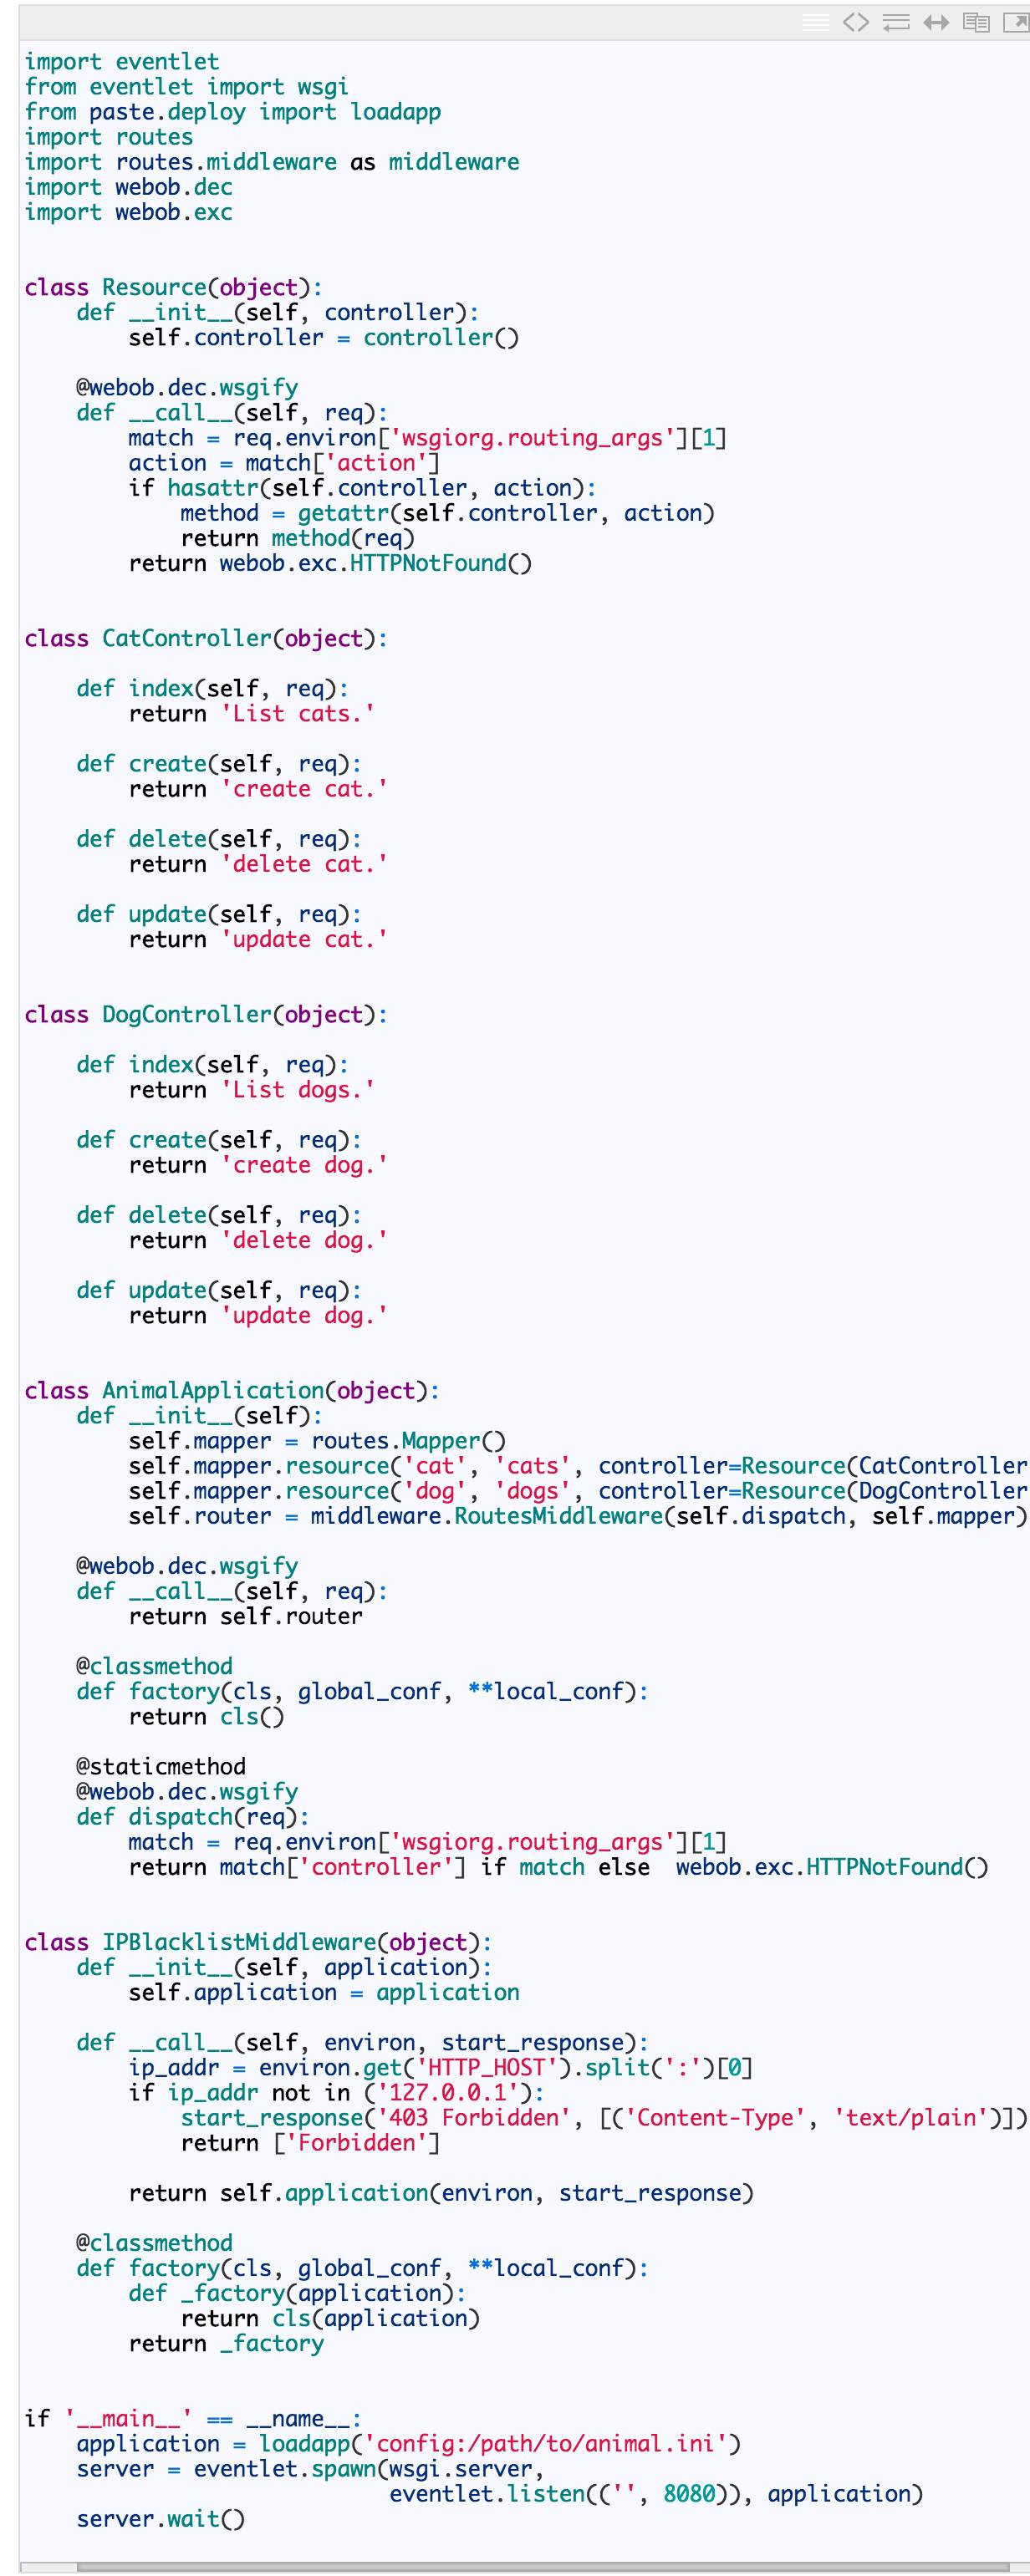
测试如下:
$
curl
127.0.0.1
:
8080
/
test
The resource could
not
be
found
.
$
curl
127.0.0.1
:
8080
/
cats
List
cats
.
$
curl
-
X
POST
127.0.0.1
:
8080
/
cats
create
cat
.
$
curl
-
X
PUT
127.0.0.1
:
8080
/
cats
/
kitty
update
cat
.
$
curl
-
X
DELETE
127.0.0.1
:
8080
/
cats
/
kitty
delete
cat
.
$
curl
127.0.0.1
:
8080
/
dogs
List
dogs
.
$
curl
-
X
DELETE
127.0.0.1
:
8080
/
dogs
/
wangcai
delete
dog
.
WSGI In Nova-api
WSGI Server
Nova-api(nova/cmd/api.py) 服务启动时,初始化 nova/wsgi.py 中的类 Server,建立了 socket 监听 IP 和端口,再由 eventlet.spawn 和 eventlet.wsgi.server 创建 WSGI server:
class
Server
(
object
)
:
"""Server class to manage a WSGI server, serving a WSGI application."""
def
__init__
(
self
,
name
,
app
,
host
=
'0.0.0.0'
,
port
=
0
,
pool_size
=
None
,
protocol
=
eventlet
.
wsgi
.
HttpProtocol
,
backlog
=
128
,
use_ssl
=
False
,
max_url_len
=
None
)
:
"""Initialize, but do not start, a WSGI server."""
self
.
name
=
name
self
.
app
=
app
self
.
_server
=
None
self
.
_protocol
=
protocol
self
.
_pool
=
eventlet
.
GreenPool
(
pool_size
or
self
.
default_pool_size
)
self
.
_logger
=
logging
.
getLogger
(
"nova.%s.wsgi.server"
%
self
.
name
)
self
.
_wsgi_logger
=
logging
.
WritableLogger
(
self
.
_logger
)
if
backlog
<
1
:
raise
exception
.
InvalidInput
(
reason
=
'The backlog must be more than 1'
)
bind_addr
=
(
host
,
port
)
# 建立 socket,监听 IP 和端口
self
.
_socket
=
eventlet
.
listen
(
bind_addr
,
family
,
backlog
=
backlog
)
def
start
(
self
)
:
"""Start serving a WSGI application.
:returns: None
"""
# 构建所需参数
wsgi_kwargs
=
{
'func'
:
eventlet
.
wsgi
.
server
,
'sock'
:
self
.
_socket
,
'site'
:
self
.
app
,
'protocol'
:
self
.
_protocol
,
'custom_pool'
:
self
.
_pool
,
'log'
:
self
.
_wsgi_logger
,
'log_format'
:
CONF
.
wsgi_log
_
format
}
if
self
.
_max_url_len
:
wsgi_kwargs
[
'url_length_limit'
]
=
self
.
_max_url_len
# 由 eventlet.sawn 启动 server
self
.
_server
=
eventlet
.
spawn
(
**
wsgi_kwargs
)
Application Side & Middleware
Application 的加载由 nova/wsgi.py 的类 Loader 完成,Loader 的 load_app 方法调用了 paste.deploy.loadapp 加载了 WSGI 的配置文件 /etc/nova/api-paste.ini:
class
Loader
(
object
)
:
"""Used to load WSGI applications from paste configurations."""


