前言
本次系列分上下两篇文章,上主要介绍从v16.0~ 16.4的新特性,下主要介绍16.5~16.8。下面就开始吧~
本篇文章较长预计需要15min(当然主要是因为demo太多),大家可以搞点瓜子边啃边看。最好能留出一只手自己在codePen上自己调试一下。
目录
v16.0
-
render 支持返回数组和字符串 演示
-
Error Boundary
-
createPortal
-
支持自定义 DOM 属性
-
Fiber
-
提升SSR渲染速度
-
减小文件体积
v16.1
react-call-return
v16.2
Fragment
v16.3
-
生命周期函数的更新
-
createContext
-
createRef
-
forwardRef
-
strict Mode
下面就开始吧~
v16.0
主要特性:
一、render可以返回字符串,数组,数字
React 15: 只可以返回单一组件,也就是说即使你返回的是一个string,也需要用div包住。
function MyComponent() {
return (
hello world
);
}
React 16: 支持返回这五类:React elements, 数组和Fragments,Portal,String/numbers,boolean/null。
class Example extends React.Component {
render() {
return [
first element
,
second element
,
];
}
}
注意:无论返回的形式是怎么样的,都要保持render是一个纯函数。所以要求我们不要改state的状态,同时不要直接跟浏览器直接交互,让它每次调用生成的结果都是一致的。
二、Error boundary(错误边界)
React 15:渲染过程中有出错,直接crash整个页面,并且错误信息不明确,可读性差
class BuggyCounter extends React.Component {
constructor(props) {
super(props);
this.state = { counter: 0 };
this.handleClick = this.handleClick.bind(this);
}
componentWillMount() {
throw new Error('I am crash');
}
handleClick() {
this.setState(({counter}) => ({
counter: counter + 1
}));
}
render() {
if (this.state.counter === 5) {
// Simulate a JS error
throw new Error('I crashed!');
}
return
# {this.state.counter}
;
}
}
function App() {
return (
This is an example of error boundaries in React 16.
Click on the numbers to increase the counters.
The counter is programmed to throw when it reaches 5. This simulates a JavaScript error in a component.
---
These two counters are inside the same error boundary. If one crashes, the error boundary will replace both of them.
---
);
}
ReactDOM.render
(
,
document.getElementById('root')
);
demo地址
比如上面这个App,可以看到子组件BuggyCounter出了点问题,在没有Error Boundary的时候,整个App都会crash掉,所以显示白屏。
React 16:用于捕获子组件树的JS异常(即错误边界只可以捕获组件在树中比他低的组件错误。),记录错误并展示一个回退的UI。
捕获范围:
-
渲染期间
-
生命周期内
-
整个组件树构造函数内
如何使用:
// 先定一个组件ErrorBoundary
class ErrorBoundary extends React.Component {
constructor(props) {
super(props);
this.state = { error: null, errorInfo: null };
}
componentDidCatch(error, errorInfo) {
// Catch errors in any components below and re-render with error message
this.setState({
error: error,
errorInfo: errorInfo
})
// You can also log error messages to an error reporting service here
}
render() {
// 有错误的时候展示回退
if (this.state.errorInfo) {
// Error path
return (
## Something went wrong.
{this.state.error && this.state.error.toString()}
{this.state.
errorInfo.componentStack}
);
}
// 正常的话,直接展示组件
return this.props.children;
}
}
class BuggyCounter extends React.Component {
constructor(props) {
super(props);
this.state = { counter: 0 };
this.handleClick = this.handleClick.bind(this);
}
componentWillMount
() {
throw new Error('I am crash');
}
handleClick() {
this.setState(({counter}) => ({
counter: counter + 1
}));
}
render() {
if (this.state.counter === 5) {
// Simulate a JS error
throw new Error('I crashed!');
}
return
# {this.state.counter}
;
}
}
function App() {
return (
This is an example of error boundaries in React 16.
Click on the numbers to increase the counters.
The counter is programmed to throw when it reaches 5. This simulates a JavaScript error in a component.
---
These two counters are inside the same error boundary. If one crashes, the error boundary will replace both of them.
---
);
}
ReactDOM.render(
,
document.getElementById('root')
);
demo演示:
可以看到加上Error Boundary之后,除了出错的组件,其他的地方都不受影响。
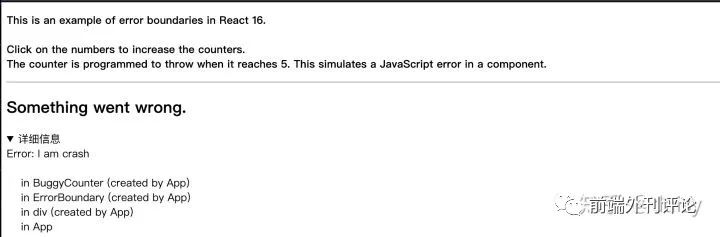 而且它很清晰的告诉我们是哪个组件发生了错误。
注意事项:
Error Boundary无法捕获下面的错误:
1、事件函数里的错误
class MyComponent extends React.Component {
constructor(props) {
super(props);
this.state = { error: null };
this.handleClick = this.handleClick.bind(this);
}
handleClick()
{
try {
// Do something that could throw
} catch (error) {
this.setState({ error });
}
}
render() {
if (this.state.error) {
return
# Caught an error.
}
return
Click Me
}
}
上面的例子中,handleClick方法里面发生的错误,Error Boundary是捕获不道德。因为它不发生在渲染阶段,所以采用try/catch来捕获。
2、异步代码(例如setTimeout 或 requestAnimationFrame 回调函数)
class
A extends React.Component {
render() {
// 此错误无法被捕获,渲染时组件正常返回 ``
setTimeout(() => {
throw new Error('error')
}, 1000)
return (
)
}
}
3、服务端渲染
因为服务器渲染不支持Error Boundary
4、Error Boundary自身抛出来的错误 (而不是其子组件)
那这里还遗留一个问题?错误边界放在哪里。一般来说,有两个地方:
1、可以放在顶层,告诉用户有东西出错。但是我个人不建议这样,这感觉失去了错误边界的意义。因为有一个组件出错了,其他正常的也没办法正常显示了
2、包在子组件外面,保护其他应用不崩溃。
三、react portal
在介绍这个新特性之前,我们先来看看为什么需要portal。在没有portal之前,如果我们需要写一个Dialog组件,我们会这样写。
...
{ needDialog ? : null }
问题:
1、最终渲染产生的html存在于JSX产生的HTML在一起,这时候dialog 如果需要position:absolute 控制位置的话,需要保证dialog 往上没有position:relative 的干扰。
2、层级关系不清晰,dialog实际是独立在app之外的。
所以这时候Portal降临。
Portal可以帮助我们在JSX中跟普通组件一样直接使用dialog, 但是又可以让dialog内容层级不在父组件内,而是显示在独立于原来app在外的同层级组件。
如何使用:
HTML:
// 这里为我们定义Dialog想要放入的位置
JS:
// These two containers are siblings in the DOM
const appRoot = document.getElementById('app-root');
const modalRoot = document.getElementById('modal-root');
// Let's create a Modal component that is an abstraction around
// the portal API.
class Modal extends React.Component {
constructor(props) {
super(props);
// Create a div that we'll render the modal into. Because each
// Modal component has its own element, we can render multiple
// modal components into the modal container.
this
.el = document.createElement('div');
}
componentDidMount() {
// Append the element into the DOM on mount. We'll render
// into the modal container element (see the HTML tab).
// 这边会将我们生成的portal element插入到modal-root里。
modalRoot.appendChild(this.el);
}
componentWillUnmount() {
// Remove the element from the DOM when we unmount
modalRoot.removeChild(this.el);
}
render() {
// Use a portal to render the children into the element
return ReactDOM.createPortal(
// Any valid React child: JSX, strings, arrays, etc.
this.props.children,
// A DOM element
this.el,
);
}
}
// The Modal component is a normal React component, so we can
// render it wherever we like without needing to know that it's
// implemented with portals.
class App extends React.Component {
constructor(props) {
super(props);
this.state = {showModal: false};
this.handleShow = this.handleShow.bind(this
);
this.handleHide = this.handleHide.bind(this);
}
handleShow() {
this.setState({showModal: true});
}
handleHide() {
this.setState({showModal: false});
}
render() {
// Show a Modal on click.
// (In a real app, don't forget to use ARIA attributes
// for accessibility!)
const modal = this.state.showModal ?
(
With a portal, we can render content into a different
part of the DOM, as if it were any other React child.
This is being rendered inside the #modal-container div.
Hide modal
) : null;
return (
This div has overflow: hidden.
Show modal
{modal}
);
}
}
ReactDOM.render(, appRoot);
Example: Portalscodepen.io
 没有portal生成与有portal的时候生成的层级关系如下:

 Example: Portalscodepen.io
可以很清楚的看到,使用portal之后,modal不在嵌在app-root里。
Example: Portalscodepen.io
可以很清楚的看到,使用portal之后,modal不在嵌在app-root里。
四、自定义DOM属性
React 15:忽略未标准化的html 和 svg属性
React 16:去掉了这个限制
为什么要做这个改动呢?两个原因:
-
不能用自定义属性,对于非标准(proposal阶段)新属性还有其他框架(Angular)很不友好
-
React 15之所以可以过滤掉非标准的属性,是因为他们维护了一个白名单的文件(放在bundle size 里)。而随着时间的增加,标准化的属性越来越多,意味着要一直维护这个文件,同时这个文件也会越来越大,增加bundle的体积。
所以还不如去掉这个限制。
演示
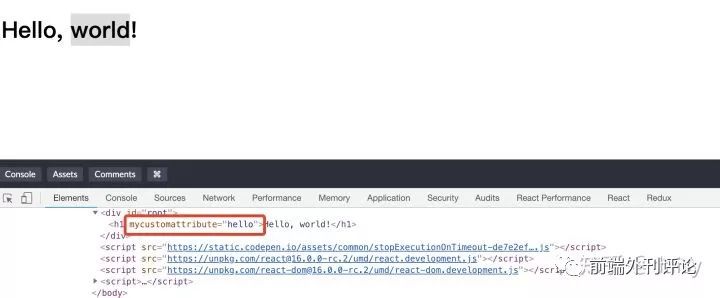 可以看到自定义属性已经生效了。
五、优化SSR
具体优化了下面五个方面:
-
生成更简洁的HTML
-
宽松的客户端一致性校验
-
无需提前编译
-
react 16服务端渲染速度更快
-
支持流式渲染
1、生成更简洁的HTML
先看下面的HTML,react 15与react 16的服务端分别会生成什么。
renderToString(

   This is some server-generatedHTML. );
react15:
有data-reactid, text noded ,react-text各种属性。
This is some server-generatedHTML.
react 16:
This is some server-generatedHTML.
可以看到,react 16去掉了很多属性,它的好处很明显:增加易读性,同时很大程度上减少html的文件大小。
2、宽松的客户端一致性校验
react 15:会将SSR的结果与客户端生成的做一个个字节的对比校验 ,一点不匹配发出waring同时就替换整个SSR生成的树。
react 16:对比校验会更宽松一些,比如,react 16允许属性顺序不一致,而且遇到不匹配的标签,还会做子树的修改,不是整个替换。
注意点: react16不会自动fix SSR 属性跟client html属性的不同,但是仍然会报waring,所以我们需要自己手动去修改。
3、无需提前编译
react 15:如果你直接使用SSR,会有很多需要检查procee.env的地方,但是读取在node中读取process.env是很消耗时间的。所以在react 15的时候,需要提前编译,这样就可以移除 process.env的引用。
react 16:只有一次检查process.env的地方,所以就不需要提前编译了,可以开箱即用。
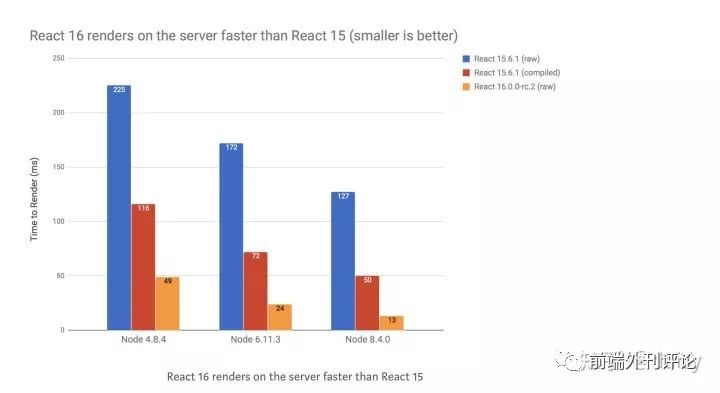
4、react 16服务端渲染速度更快
为什么呢? 因为react 15下,server client都需要生成vDOM,但是其实在服务端, 当我们使用renderToString的时候,生成的vDom就会被立即抛弃掉, 所以在server端生成vDom是没有意义的。
 5、支持流式渲染
会提升首个字节到的速度,不过我试了一下,会闪屏,所以我不太推荐使用 除非我们的页面做到一个空的框架先来,内容在填充
新的API server: renderyToNodeStream, renderToStaticNodeStream (renderToString, renderToStaticMarkup) client: hydyate
如何使用:
React 15:
// server:
// using Express client
import { renderToString } from "react-dom/server"
import MyPage from "./MyPage"
app.get("/", (req, res) => {
res.write("My Page");
res.write("
");
res.write(renderToString());
res.write("
");
res.end();
});
// client
import { render } from "react-dom"
import MyPage from "./MyPage"
render(, document.getElementById("content"));
React 16:
其实就是吧client端的render改成hydrate。
// client
import { hydrate } from "react-dom"
import MyPage from "./MyPage"
hydrate(, document.getElementById("content"));
当然,现在依然兼容render,但是17之后不再兼容,所以还是直接用hydrate好一点。
注意事项:不支持ErrorBoundary 跟Portal,所以需要直出的页面就不能用了。
五、减小了32%bundle的体积
React 库大小从 20.7kb(压缩后 6.9kb)降低到 5.3kb(压缩后 2.2kb)
ReactDOM 库大小从 141kb(压缩后 42.9kb)降低到 103.7kb(压缩后 32.6kb)
React + ReactDOM 库大小从 161.7kb(压缩后 49.8kb)降低到 109kb(压缩后 43.8kb)
六、Fiber
由于Fiber不是新的API,是react对于对比更新的一种新算法,它影响着生命周期函数的变化跟异步渲染。需要详细了解的同学可以戳下面的链接,这应该是我看过最易懂得解释Fiber得视频。https://www.youtube.com/watch?v=VLAqywvHpD0www.youtube.com
v16.1
react-call-return
这就是一个库,平时用的比较少,所以暂时不讲。
v16.2
主要特性:Fragement
React 15:render函数只能接受一个组件,所以一定要外层包一层
。
React16:可以通过Fragement直接返回多个组件。
render
() {
return (
<>
);
}
但是这样看起来,似乎可以用v16.0 return一个数组搞定。
但是返回数组是有缺点的,比如:这段html
Some text.
## A heading
More text.
## Another heading
Even more text.
用Fragment写,方便又快捷:
render() {
return (
// Extraneous div element :(
Some text.
## A heading
More text.
## Another heading
Even more text
.
);
}
用数组写.... 一言难尽(什么,你还没看出来有什么区别!下面我来带你)
render() {
return [
"Some text.",
## A heading
,
"More text.",
## Another heading
,
"Even more text."
];
}
缺点:
-
数组里的子节点必须要用逗号分离
-
数组里的子节点必须要带key防止waring
-
string类型要用双引号括住
所以,Fragement还是很大程度上给我们提供了便利。
注意点:
<> 不支持写入属性,包括keys。如果你需要keys,你可以直接使用
(但是Fragment也只可以接受keys这一个属性,将来会支持更多)
function Glossary(props) {
return (
{props.items.
map(item => (
// Without the `key`, React will fire a key warning
{item.term}{item.description}
))}
);
}
官方演示
16.3
一、新的生命周期函数
由于异步渲染的改动,有可能会导致componentWillMount, componentWillReceiveProps,componentWillUpdate ,所以需要抛弃三个函数。
由于这是一个很大的改变会影响很多现有的组件,所以需要慢慢的去改。 目前react 16 只是会报waring,在react 17你就只能在前面加"UNSAFE_" 的前缀 来使用。不能不说react团队真是太贴心了,他们还写了一个脚本自动帮你加上 这些前缀。疯狂打call~
同时新加了两个生命周期函数来替代他们,分别是:
getDerivedStateFromProps:这个方法用于替代componentWillReceiveProps,相关内容可以看这篇文章,但是大多数情况下,都不需要用到这两种方法。 因为你都可以用其他办法来替代。
而getSnapshotBeforeUpate使用的场景很少,这里就不介绍了。
二、新的context API
1、context 就是可以使用全局的变量,不需要一层层pass props下去,比如主题颜色
// Context lets us pass a value deep into the component tree
// without explicitly threading it through every component.
// Create a context for the current theme (with "light" as the default).
const ThemeContext = React.createContext('light');
class App extends React.Component {
render() {
// Use a Provider to pass the current theme to the tree below.
// Any component can read it, no matter how deep it is.
// In this example, we're passing "dark" as the current value.
return (
);
}
}
// A component in the middle doesn't have to
// pass the theme down explicitly anymore.
function Toolbar(props) {
return (