
来源 | http://suo.im/5PaEZI
在实际的开发项目中,
一个对外暴露的接口往往会面临,瞬间大量的重复的请求提交
,如果想过滤掉重复请求造成对业务的伤害,那就需要
实现幂等
!
我们来解释一下幂等的概念:
任意多次执行所产生的影响均与一次执行的影响相同
。
按照这个含义,最终的含义就是
对数据库的影响只能是一次性的,不能重复处理。
如何保证其幂等性,通常有以下手段:
1、
数据库建立唯一性索引,可以保证最终插入数据库的只有一条数据
2、
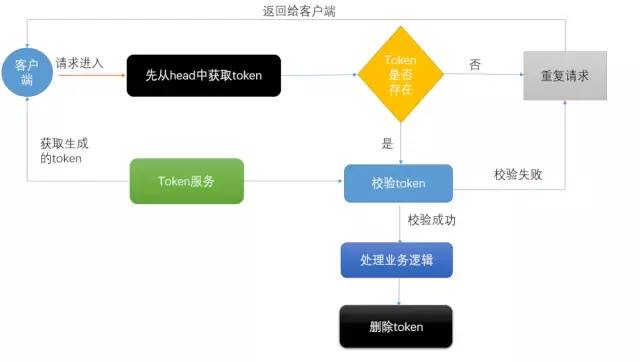
token机制,每次接口请求前先获取一个token,然后再下次请求的时候在请求的header体中加上这个token,后台进行验证,如果验证通过删除token,下次请求再次判断token
3、
悲观锁或者乐观锁,悲观锁可以保证每次for update的时候其他sql无法update数据(在数据库引擎是innodb的时候,select的条件必须是唯一索引,防止锁全表)
4、
先查询后判断,首先通过查询数据库是否存在数据,如果存在证明已经请求过了,直接拒绝该请求,如果没有存在,就证明是第一次进来,直接放行。
redis实现自动幂等的原理图:
一、搭建redis的服务Api
1、
首先是搭建redis服务器。
2、
引入springboot中到的redis的stater,或者Spring封装的jedis也可以,后面主要用到的api就是它的set方法和exists方法,这里我们使用springboot的封装好的redisTemplate
/**
* redis工具类
*/
@Component
publicclassRedisService{
@Autowired
privateRedisTemplate redisTemplate;
/**
* 写入缓存
* @param key
* @param value
* @return
*/
publicbooleanset(finalString key, Object value) {
boolean result = false;
try{
ValueOperations<Serializable
, Object> operations = redisTemplate.opsForValue();
operations.set(key, value);
result = true;
} catch(Exception e) {
e.printStackTrace();
}
return result;
}
/**
* 写入缓存设置时效时间
* @param key
* @param value
* @return
*/
publicboolean setEx(finalString key, Object value, Long expireTime) {
boolean result = false;
try{
ValueOperations<Serializable, Object> operations = redisTemplate.opsForValue();
operations.set(key, value);
redisTemplate.expire(key, expireTime, TimeUnit.SECONDS);
result = true;
} catch(Exception e) {
e.printStackTrace();
}
return result;
}
/**
* 判断缓存中是否有对应的value
* @param key
* @return
*/
publicboolean exists(finalString key) {
return redisTemplate.hasKey(key);
}
/**
* 读取缓存
* @param key
* @return
*/
publicObjectget(finalString key) {
Object result = null;
ValueOperations<Serializable, Object> operations = redisTemplate.opsForValue();
result = operations.get(key);
return result;
}
/**
* 删除对应的value
* @param key
*/
publicboolean remove(finalString key) {
if(exists(key)) {
Booleandelete= redisTemplate.delete(key);
returndelete;
}
returnfalse;
}
}
二、自定义注解AutoIdempotent
自定义一个注解,定义此注解的主要目的是把它添加在需要实现幂等的方法上,凡是某个方法注解了它,都会实现自动幂等。
后台利用反射如果扫描到这个注解,就会处理这个方法实现自动幂等,使用元注解ElementType.METHOD表示它只能放在方法上,etentionPolicy.RUNTIME表示它在运行时
。
@Target({ElementType.METHOD})
@Retention(RetentionPolicy.RUNTIME)
public@interfaceAutoIdempotent{
}
三、token创建和检验
1、
token服务接口
我们新建一个接口,创建token服务,里面主要是两个方法,一个用来创建token,一个用来验证token。
创建token主要产生的是一个字符串,检验token的话主要是传达request对象,为什么要传request对象呢?
主要作用就是获取header里面的token,然后检验,通过抛出的Exception来获取具体的报错信息返回给前端。
publicinterfaceTokenService{
/**
* 创建token
* @return
*/
public String createToken();
/**
* 检验token
* @param request
* @return
*/
publicboolean checkToken(HttpServletRequest request) throwsException;
}
2、
token的服务实现类
token引用了redis服务,创建token采用随机算法工具类生成随机uuid字符串,然后放入到redis中(为了防止数据的冗余保留,这里设置过期时间为10000秒,具体可视业务而定),如果放入成功,最后返回这个token值。
checkToken方法就是从header中获取token到值(如果header中拿不到,就从paramter中获取),如若不存在,直接抛出异常。
这个异常信息可以被拦截器捕捉到,然后返回给前端。
@Service
publicclassTokenServiceImplimplementsTokenService{
@Autowired
privateRedisService redisService;
/**
* 创建token
*
* @return
*/
@Override
publicString createToken() {
String str = RandomUtil.randomUUID();
StrBuilder token = newStrBuilder();
try{
token.append(Constant.Redis.TOKEN_PREFIX).append(str);
redisService.setEx(token.toString(), token.toString(),10000L);
boolean notEmpty = StrUtil.isNotEmpty(token.toString());
if(notEmpty) {
return token.toString();
}
}catch(Exception ex){
ex.printStackTrace();
}
returnnull;
}
/**
* 检验token
*
* @param request
* @return
*/
@Override
publicboolean checkToken(HttpServletRequest request) throwsException{
String token = request.getHeader(Constant.TOKEN_NAME);
if(StrUtil.isBlank(token)) {// header中不存在token
token = request.getParameter(Constant.TOKEN_NAME);
if(StrUtil.isBlank(token)) {// parameter中也不存在token
thrownewServiceException(Constant.ResponseCode.ILLEGAL_ARGUMENT, 100);
}
}
if(!redisService.exists(token)) {
thrownewServiceException(Constant.ResponseCode.REPETITIVE_OPERATION, 200);
}
boolean remove = redisService.remove(token);
if(!remove) {
thrownewServiceException(Constant.ResponseCode.REPETITIVE_OPERATION, 200);
}
returntrue;
}
}
四、拦截器的配置
1、
web配置类,实现WebMvcConfigurerAdapter,主要作用就是添加autoIdempotentInterceptor到配置类中,这样我们到拦截器才能生效,注意使用@Configuration注解,这样在容器启动是时候就可以添加进入context中。
@Configuration
publicclassWebConfigurationextendsWebMvcConfigurerAdapter{
@Resource
privateAutoIdempotentInterceptor autoIdempotentInterceptor;
/**
* 添加拦截器
* @param registry
*/
@Override
publicvoid addInterceptors(InterceptorRegistry registry) {
registry.addInterceptor(autoIdempotentInterceptor);
super.addInterceptors(registry);
}
}
2、
拦截处理器:
主要的功能是拦截扫描到AutoIdempotent到注解到方法,然后调用tokenService的checkToken()方法校验token是否正确,如果捕捉到异常就将异常信息渲染成json返回给前端
/**
* 拦截器
*/
@Component
publicclassAutoIdempotentInterceptorimplementsHandlerInterceptor{
@Autowired
privateTokenService tokenService;
/**
* 预处理
*
* @param request
* @param response
* @param handler
* @return
* @throws Exception
*/
@Override
publicboolean preHandle(HttpServletRequest request, HttpServletResponse response, Object handler) throwsException{
if(!(handler instanceofHandlerMethod)) {
returntrue;
}
HandlerMethod handlerMethod = (HandlerMethod) handler;
Method method = handlerMethod.getMethod();
//被ApiIdempotment标记的扫描
AutoIdempotent methodAnnotation = method.getAnnotation(AutoIdempotent.class);
if(methodAnnotation != null) {
try{
return tokenService.checkToken(request);// 幂等性校验, 校验通过则放行, 校验失败则抛出异常, 并通过统一异常处理返回友好提示
}catch(Exception ex){
ResultVo failedResult = ResultVo.getFailedResult(101, ex.getMessage());
writeReturnJson(response, JSONUtil.toJsonStr(failedResult));
throw ex;
}
}
//必须返回true,否则会被拦截一切请求
returntrue;
}
@Override
publicvoid postHandle(HttpServletRequest request, HttpServletResponse response, Object handler, ModelAndView modelAndView) throwsException{
}
@Override


