
今天跟大家分享基于源码看Tomcat 在 SpringBoot 中的启动
的
知识。
1
基于源码看Tomcat 在 SpringBoot 中的启动
前言
我们知道 SpringBoot 给我们带来了一个全新的开发体验,我们可以直接把 web 程序达成 jar 包,直接启动,这就得益于 SpringBoot 内置了容器,可以直接启动,本文将以 Tomcat 为例,来看看 SpringBoot 是如何启动 Tomcat 的,同时也将展开学习下 Tomcat 的源码,了解 Tomcat 的设计。
Main 方法说起
用过 SpringBoot 的人都知道,首先要写一个 main 方法来启动
@SpringBootApplicationpublicclass TomcatdebugApplication {
    public static void main(String[] args) {        SpringApplication.run(TomcatdebugApplication.class, args);    }
}
我们直接点击 run 方法的源码,跟踪下来,发下最终的 run 方法是调用 ConfigurableApplicationContext 方法,源码如下:
public ConfigurableApplicationContext run(String... args) { StopWatch stopWatch = new StopWatch(); stopWatch.start(); ConfigurableApplicationContext context = null; CollectionexceptionReporters = new ArrayList<>(); configureHeadlessProperty(); SpringApplicationRunListeners listeners = getRunListeners(args); listeners.starting(); try { ApplicationArguments applicationArguments = new DefaultApplicationArguments(args); ConfigurableEnvironment environment = prepareEnvironment(listeners, applicationArguments); configureIgnoreBeanInfo(environment); Banner printedBanner = printBanner(environment); context = createApplicationContext(); exceptionReporters = getSpringFactoriesInstances(SpringBootExceptionReporter.class, new Class[] { ConfigurableApplicationContext.class }, context); prepareContext(context, environment, listeners, applicationArguments, printedBanner); refreshContext(context); afterRefresh(context, applicationArguments); stopWatch.stop(); if (this.logStartupInfo) { new StartupInfoLogger(this.mainApplicationClass).logStarted(getApplicationLog(), stopWatch); } listeners.started(context); callRunners(context, applicationArguments); } catch (Throwable ex) { handleRunFailure(context, ex, exceptionReporters, listeners); throw new IllegalStateException(ex); }
try { listeners.running(context); } catch (Throwable ex) { handleRunFailure(context, ex, exceptionReporters, null); throw new IllegalStateException(ex); } return context; }
其实这个方法我们可以简单的总结下步骤为 > 1. 配置属性 > 2. 获取监听器,发布应用开始启动事件 > 3. 初始化输入参数 > 4. 配置环境,输出 banner > 5. 创建上下文 > 6. 预处理上下文 > 7. 刷新上下文 > 8. 再刷新上下文 > 9. 发布应用已经启动事件 > 10. 发布应用启动完成事件
其实上面这段代码,如果只要分析 tomcat 内容的话,只需要关注两个内容即可,上下文是如何创建的,上下文是如何刷新的,分别对应的方法就是 createApplicationContext() 和 refreshContext(context),接下来我们来看看这两个方法做了什么。
protected ConfigurableApplicationContext createApplicationContext() { Class contextClass = this.applicationContextClass; if (contextClass == null) { try { switch (this.webApplicationType) { case SERVLET: contextClass = Class.forName(DEFAULT_SERVLET_WEB_CONTEXT_CLASS); break; case REACTIVE: contextClass = Class.forName(DEFAULT_REACTIVE_WEB_CONTEXT_CLASS); break; default: contextClass = Class.forName(DEFAULT_CONTEXT_CLASS);
} } catch (ClassNotFoundException ex) { thrownew IllegalStateException( "Unable create a default ApplicationContext, " + "please specify an ApplicationContextClass", ex); } } return (ConfigurableApplicationContext) BeanUtils.instantiateClass(contextClass); }
这里就是根据我们的 webApplicationType 来判断创建哪种类型的 Servlet,代码中分别对应着 Web 类型(SERVLET),响应式 Web 类型(REACTIVE),非 Web 类型(default),我们建立的是 Web 类型,所以肯定实例化 DEFAULT_SERVLET_WEB_CONTEXT_CLASS 指定的类,也就是 AnnotationConfigServletWebServerApplicationContext 类
我们来用图来说明下这个类的关系
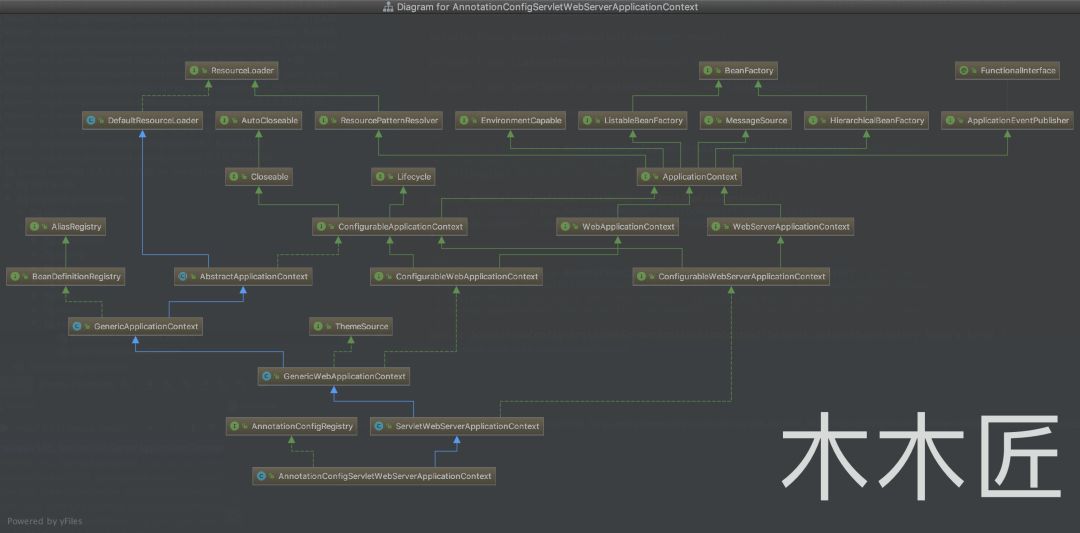
通过这个类图我们可以知道,这个类继承的是 ServletWebServerApplicationContext,这就是我们真正的主角,而这个类最终是继承了 AbstractApplicationContext,了解完创建上下文的情况后,我们再来看看刷新上下文,相关代码如下:
private void refreshContext(ConfigurableApplicationContext context) { refresh(context); if (this.registerShutdownHook) { try { context.registerShutdownHook(); } catch (AccessControlException ex) { } } }
protected void refresh(ApplicationContext applicationContext) { Assert.isInstanceOf(AbstractApplicationContext.class, applicationContext); ((AbstractApplicationContext) applicationContext).refresh(); }
这里还是直接传递调用本类的 refresh(context)方法,最后是强转成父类 AbstractApplicationContext 调用其 refresh()方法,该代码如下:
public void refresh() throws BeansException, IllegalStateException { synchronized (this.startupShutdownMonitor) { prepareRefresh();
ConfigurableListableBeanFactory beanFactory = obtainFreshBeanFactory();
prepareBeanFactory(beanFactory);
try { postProcessBeanFactory(beanFactory);
invokeBeanFactoryPostProcessors(beanFactory);
registerBeanPostProcessors(beanFactory);
initMessageSource();
initApplicationEventMulticaster();
onRefresh();
registerListeners();
finishBeanFactoryInitialization(beanFactory);
finishRefresh(); }
catch (BeansException ex) { if (logger.isWarnEnabled()) { logger.warn("Exception encountered during context initialization - " + "cancelling refresh attempt: " + ex); }
destroyBeans();
cancelRefresh(ex);
throw ex; }
finally { resetCommonCaches(); } } }
这里我们看到 onRefresh()方法是调用其子类的实现,根据我们上文的分析,我们这里的子类是 ServletWebServerApplicationContext。
protected void onRefresh() { super.onRefresh(); try { createWebServer(); } catch (Throwable ex) { thrownew ApplicationContextException("Unable to start web server", ex); } }
private void createWebServer() { WebServer webServer = this.webServer; ServletContext servletContext = getServletContext(); if (webServer == null && servletContext == null) { ServletWebServerFactory factory = getWebServerFactory(); this
.webServer = factory.getWebServer(getSelfInitializer()); } elseif (servletContext != null) { try { getSelfInitializer().onStartup(servletContext); } catch (ServletException ex) { thrownew ApplicationContextException("Cannot initialize servlet context", ex); } } initPropertySources(); }
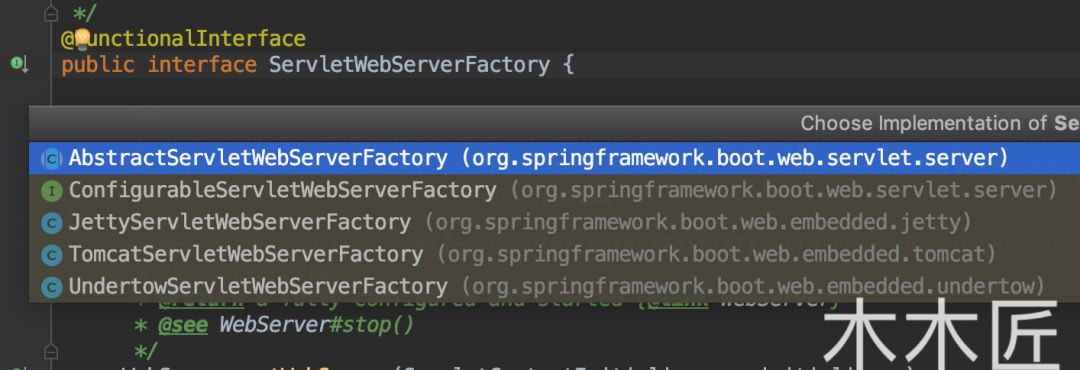
到这里,其实庐山真面目已经出来了,createWebServer()就是启动 web 服务,但是还没有真正启动 Tomcat,既然 webServer 是通过 ServletWebServerFactory 来获取的,我们就来看看这个工厂的真面目。
走进 Tomcat 内部
根据上图我们发现,工厂类是一个接口,各个具体服务的实现是由各个子类来实现的
所以我们就去看看 TomcatServletWebServerFactory.getWebServer()的实现。
@Override public WebServer getWebServer(ServletContextInitializer... initializers) { Tomcat tomcat = new Tomcat(); File baseDir = (this.baseDirectory != null) ? this.baseDirectory : createTempDir("tomcat"); tomcat.setBaseDir(baseDir.getAbsolutePath()); Connector connector = new Connector(this.protocol); tomcat.getService().addConnector(connector); customizeConnector(connector); tomcat.setConnector(connector); tomcat.getHost().setAutoDeploy(false); configureEngine(tomcat.getEngine()); for (Connector additionalConnector : this.additionalTomcatConnectors) { tomcat.getService().addConnector(additionalConnector); } prepareContext(tomcat.getHost(), initializers); return getTomcatWebServer(tomcat); }
根据上面的代码,我们发现其主要做了两件事情,第一件事就是把 Connnctor(我们称之为连接器)对象添加到 Tomcat 中,第二件事就是 configureEngine,这连接器我们勉强能理解(不理解后面会述说),那这个 Engine 是什么呢?
我们查看 tomcat.getEngine()的源码:
public Engine getEngine() { Service service = getServer().findServices()[0]; if (service.getContainer() != null) { return service.getContainer(); } Engine engine = new StandardEngine(); engine.setName( "Tomcat" ); engine.setDefaultHost(hostname); engine.setRealm(createDefaultRealm()); service.setContainer(engine); return engine; }
根据上面的源码,我们发现,原来这个 Engine 是容器,我们继续跟踪源码,找到 Container 接口
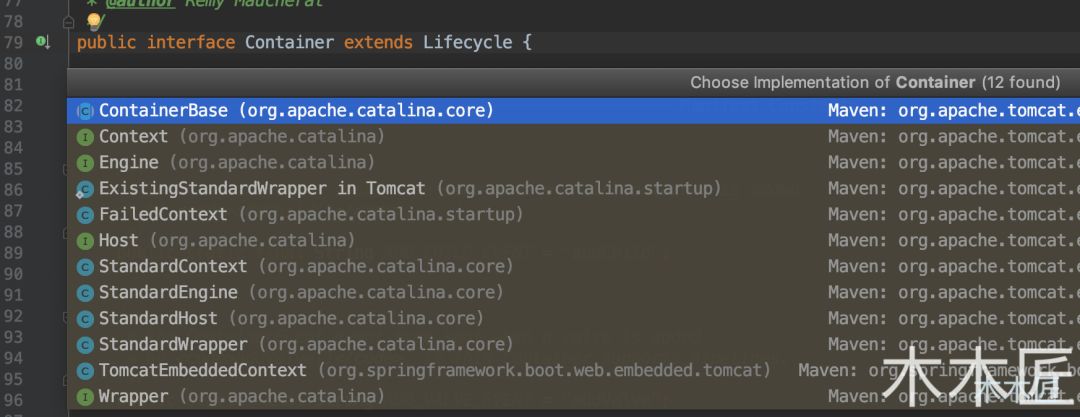
上图中,我们看到了 4 个子接口,分别是 Engine,Host,Context,Wrapper。我们从继承关系上可以知道他们都是容器
那么他们到底有啥区别呢?我看看他们的注释是怎么说的。
publicinterface Engine extends Container { }
public interface Host extends Container {
}
public interface Context extends Container, ContextBind { }
publicinterface Wrapper extends Container {
}
上面的注释翻译过来就是,Engine 是最高级别的容器,其子容器是 Host,Host 的子容器是 Context,Wrapper 是 Context 的子容器,所以这 4 个容器的关系就是父子关系,也就是 Engine>Host>Context>Wrapper。
我们再看看 Tomcat 类的源码:
publicclass Tomcat { public void setConnector(Connector connector) { Service service = getService(); boolean found = false; for (Connector serviceConnector : service.findConnectors()) { if (connector == serviceConnector) { found = true; } } if (!found) { service.addConnector(connector); } } public Service getService() { return getServer().findServices()[0]; } public void setHost(Host host) { Engine engine = getEngine(); boolean found = false; for (Container engineHost : engine.findChildren()) { if (engineHost == host) { found = true; } } if (!found) { engine.addChild(host); } } public Engine getEngine() { Service service = getServer().findServices()[0]; if (service.getContainer() != null) { return service.getContainer(); } Engine engine = new StandardEngine(); engine.setName( "Tomcat" ); engine.setDefaultHost(hostname); engine.setRealm(createDefaultRealm()); service.setContainer(engine); return engine; } public Server getServer() {
if (server != null) { return server; }
System.setProperty("catalina.useNaming", "false");
server = new StandardServer();
initBaseDir();
ConfigFileLoader.setSource(new CatalinaBaseConfigurationSource(new File(basedir), null));
server.setPort( -1 );
Service service = new StandardService(); service.setName("Tomcat"); server.addService(service); return server; }
public Context addContext(Host host, String contextPath, String contextName, String dir) { silence(host, contextName); Context ctx = createContext(host, contextPath);


