
很早以前在研究图像超分辨率的时候有看到用GAN的方法做super resolution的工作,后来也陆续看到很多生成图像的东西,有很多好玩的应用:
– pix2pix
– text2image
前面我的博客里面也提到有一篇GAN的理解与TF的实现。今天,我们这里不将啥原理,我们主要跑下最近看到的deepcolor这个项目,这个项目就是使用了
所谓的条件生成式对抗网络(Conditional Generative Adversarial Nets)。
原始的github地址在https://github.com/kvfrans/deepcolor,作者看起来是一个年级特别小的美帝亚裔小伙子,编程还是要从娃娃抓起呀。
我fork了项目,修改了下爬数据的脚本,加了个多线程,然后适配了TensorFlow1.0,项目地址:tensorflow-101/deepcolor
import os
import Queue
from threading import Thread
from time import time
from itertools import chain
import urllib2
import untangle
import numpy as np
import cv2
def download_imgs(url):
# count = 0
maxsize = 512
file_name = url.split('=')[-1]
header = {'Referer':'http://safebooru.org/index.php?page=post&s=list','User-Agent' : 'Mozilla/5.0 (Macintosh; Intel Mac OS X 10_12_3) AppleWebKit/537.36 (KHTML, like Gecko) Chrome/56.0.2924.87 Safari/537.36'}
request = urllib2.Request(url, headers=header)
stringreturn = urllib2.urlopen(request).read()
xmlreturn = untangle.parse(stringreturn)
count = 0
print xmlreturn.posts[0]['sample_url']
try:
for post in xmlreturn.posts.post:
try:
imgurl = "http:" + post["sample_url"]
print imgurl
if ("png" in imgurl) or ("jpg" in imgurl):
resp = urllib2.urlopen(imgurl)
image = np.asarray(bytearray(resp.read()), dtype="uint8")
image = cv2.imdecode(image, cv2.IMREAD_COLOR)
height, width = image.shape[:2]
if height > width:
scalefactor = (maxsize*1.0) / width
res = cv2.resize(image,(int(width * scalefactor), int(height*scalefactor)), interpolation = cv2.INTER_CUBIC)
cropped = res[0:maxsize,0:maxsize]
if width >= height:
scalefactor = (maxsize*1.0) / height
res = cv2.resize(image,(int(width * scalefactor), int(height*scalefactor)), interpolation = cv2.INTER_CUBIC)
center_x = int(round(width*scalefactor*0.5))
print center_x
cropped = res[0:maxsize,center_x - maxsize/2:center_x + maxsize/2]
count += 1
cv2.imwrite("imgs-valid/"+file_name+'_'+str(count)+'.jpg',cropped)
except:
continue
except:
print "no post in xml"
return
class DownloadWorker(Thread):
def __init__(self, queue):
Thread.__init__(self)
self.queue = queue
def run(self):
while True:
# Get the work from the queue and expand the tuple
url = self.queue.get()
if url is None:
break
# download_link(directory, link)
download_imgs(url)
self.queue.task_done()
if __name__ == '__main__':
start = time()
download_queue = Queue.Queue(maxsize=100)
for x in range(8):
worker = DownloadWorker(download_queue)
worker.daemon = True
worker.start()
url_links = ["http://safebooru.org/index.php?page=dapi&s=post&q=index&tags=1girl%20solo&pid="+str(i+5000) for i in xrange(10000)]
# print url_links[:10]
for link in url_links:
download_queue.put(link)
download_queue.join()
print "the images num is {0}".format(len(url_links))
print "took time : {0}".format(time() - start)
貌似从web页面见交互的json文件拿到image的公开链地址,然后下载,但是这里有点小问题:我这里["http://safebooru.org/index.php?
page=dapi&s=post&q=index&tags=1girl%20solo&pid="+str(i+5000) for i in xrange(10000)]当i到288之后就跑不了,以为被封了ip,但是从新开始又是可以的,而且浏览器都是可以浏览的,很奇怪,不过也不care了,我这里大概拿到28059张
动漫的图像
随便找了几张:
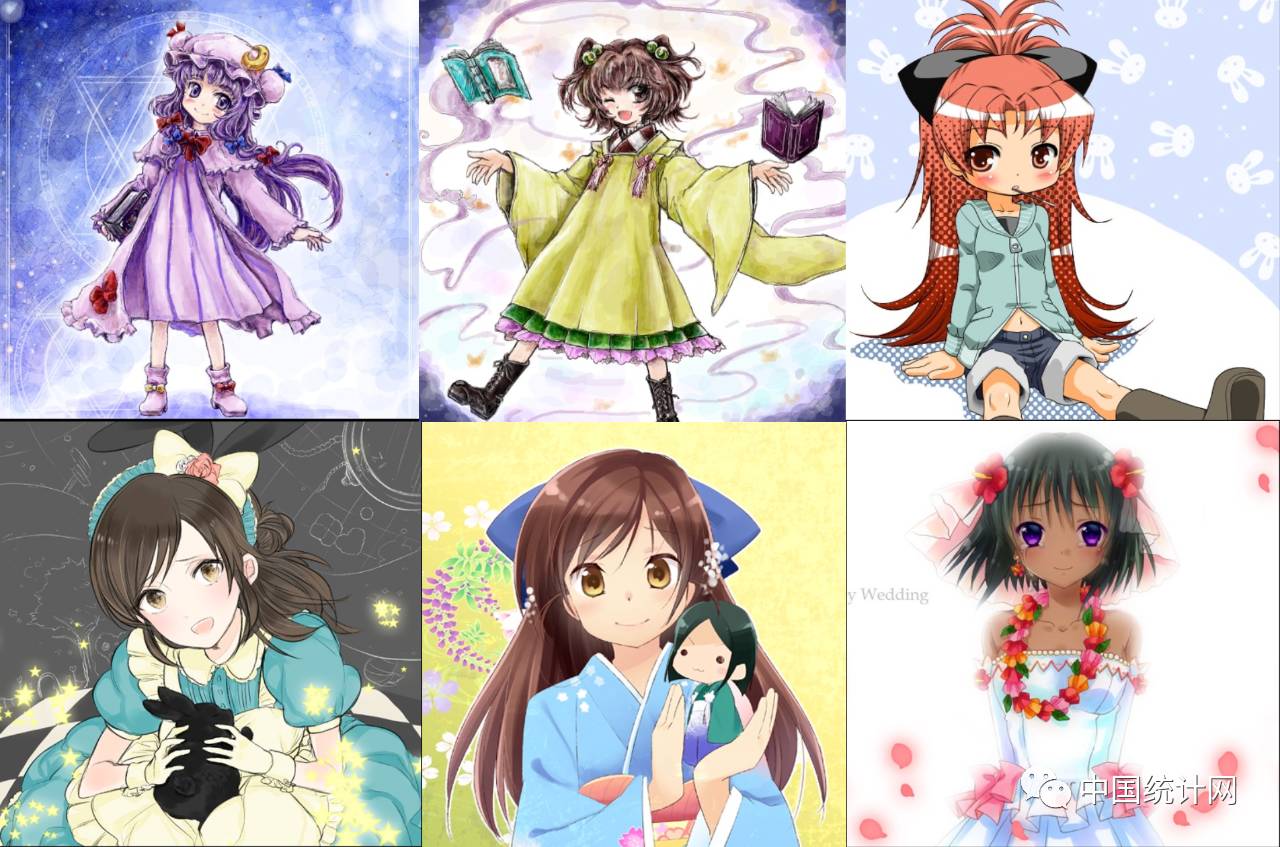
不要问我为啥都是妹纸的图,我也不知道,也许美帝的小伙伴口味就是这样(如果是我的话,我肯定关注火影,秦时明月这种的)
为了节省想要玩下的小伙伴的时间,我把爬到的照片放到了百度云上,地址在这儿
https://pan.baidu.com/s/1c1HOIHU
为了让计算机学会去自动给漫画涂上颜色,我们首先需要有一批需要上色的图像,这里我们拿到了一批网上的漫画图,我们只需要用OpenCV这个工具来生成对应的线图就好啦,这和超分辨率很类似,是在
cv上少数的不需要做相关标注工作的应用
base_edge = np.array([cv2.adaptiveThreshold(cv2.cvtColor(ba, cv2.COLOR_BGR2GRAY), 255, cv2.ADAPTIVE_THRESH_MEAN_C, cv2.THRESH_BINARY, blockSize=9, C=2) for ba in base]) / 255.0
一行代码,就可以搞定,但是个人认为他这里的处理太粗糙,这里可以做一些精致的提升,比如梯度,当然这里还有个脚本演示,如何生成对应的灰度图
import cv2
import numpy as np
from matplotlib import pyplot as plt
from glob import glob
from random import randint
data = glob("imgs-valid/*.jpg")
for imname in data:
cimg = cv2.imread(imname,1)
cimg = np.fliplr(cimg.reshape(-1,3)).reshape(cimg.shape)
cimg = cv2.resize(cimg, (256,256))
img = cv2.imread(imname,0)
# kernel = np.ones((5,5),np.float32)/25
for i in xrange(30):
randx = randint(0,205)
randy = randint(0,205)
cimg[randx:randx+50, randy:randy+50] = 255
blur = cv2.blur(cimg,(100,100))
# img_gray = cv2.cvtColor(img, cv2.COLOR_RGB2GRAY)
img_edge = cv2.adaptiveThreshold(img, 255,
cv2.ADAPTIVE_THRESH_MEAN_C,
cv2.THRESH_BINARY,
blockSize=9,
C=2)
# img_edge = cv2.cvtColor(img_edge, cv2.COLOR_GRAY2RGB)
# img_cartoon = cv2.bitwise_and(img, img_edge)
plt.subplot(131),plt.imshow(cimg)
plt.title('Original Image'), plt.xticks([]), plt.yticks([])
plt.subplot(132),plt.imshow(blur)
plt.title('Edge Image'), plt.xticks([]), plt.yticks([])
plt.subplot(133),plt.imshow(img_edge,cmap = 'gray')
plt.title('Edge Image'), plt.xticks([]), plt.yticks([])
plt.show()
Conditional Generative Adversarial Nets网络如下图所示,和原始的GAN相比,不是有随机的噪声生成,而且input的图像的值和label值,这里就是线图和真实我们爬下的图:
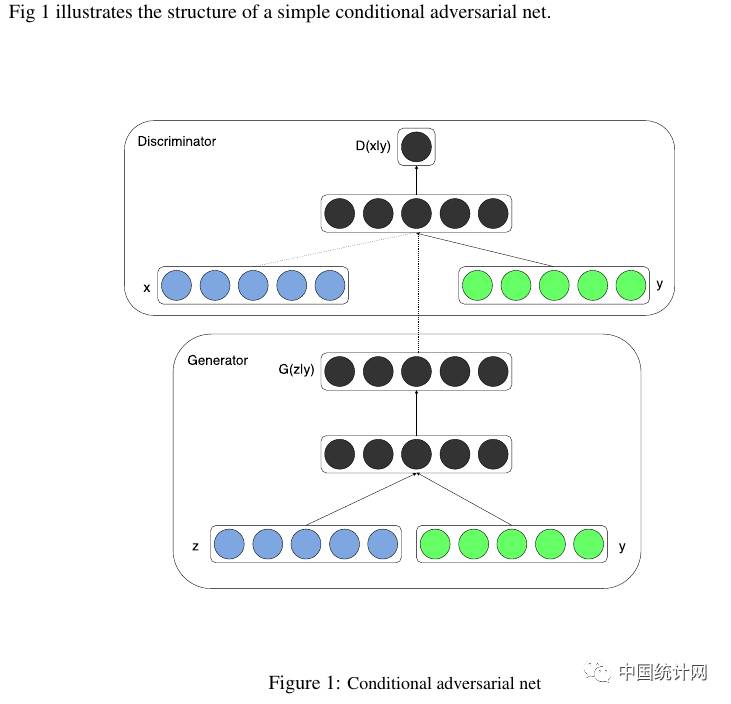
G和D的网络结构如下:
def discriminator(self, image, y=None, reuse=False):
# image is 256 x 256 x (input_c_dim + output_c_dim)
with tf.variable_scope("discriminator") as scope:
if reuse:
tf.get_variable_scope().reuse_variables()
else:
assert tf.get_variable_scope().reuse == False
h0 = lrelu(conv2d(image, self.df_dim, name='d_h0_conv')) # h0 is (128 x 128 x self.df_dim)
h1 = lrelu(self.d_bn1(conv2d(h0, self.df_dim*2, name='d_h1_conv'))) # h1 is (64 x 64 x self.df_dim*2)
h2 = lrelu(self.d_bn2(conv2d(h1, self.df_dim*4, name='d_h2_conv'))) # h2 is (32 x 32 x self.df_dim*4)
h3 = lrelu(self.d_bn3(conv2d(h2, self.df_dim*8, d_h=1, d_w=1, name='d_h3_conv'))) # h3 is (16 x 16 x self.df_dim*8)
h4 = linear(tf.reshape(h3, [self.batch_size, -1]), 1, 'd_h3_lin')
return tf.nn.sigmoid(h4), h4
def generator(self, img_in):
with tf.variable_scope("generator") as scope:
s = self.output_size
s2, s4, s8, s16, s32, s64, s128 = int(s/2), int(s/4), int(s/8), int(s/16), int(s/32), int(s/64), int(s/128)
# image is (256 x 256 x input_c_dim)
e1 = conv2d(img_in, self.gf_dim, name='g_e1_conv') # e1 is (128 x 128 x self.gf_dim)
e2 = bn(conv2d(lrelu(e1), self.gf_dim*2, name='g_e2_conv')) # e2 is (64 x 64 x self.gf_dim*2)
e3 = bn(conv2d(lrelu(e2), self.gf_dim*4, name='g_e3_conv')) # e3 is (32 x 32 x self.gf_dim*4)
e4 = bn(conv2d(lrelu(e3), self.gf_dim*8, name='g_e4_conv')) # e4 is (16 x 16 x self.gf_dim*8)
e5 = bn(conv2d(lrelu(e4), self.gf_dim*8, name='g_e5_conv')) # e5 is (8 x 8 x self.gf_dim*8)
self.d4, self.d4_w, self.d4_b = deconv2d(tf.nn.relu(e5), [self.batch_size, s16, s16, self.gf_dim*8], name='g_d4', with_w=True)
d4 = bn(self.d4)


