(点击上方公众号,可快速关注)
来源:Nisen
链接:segmentfault.com/a/1190000007655060
参考资料
ctypes简介
一直对不同语言间的交互感兴趣,python和C语言又深有渊源,所以对python和c语言交互产生了兴趣。
最近了解了python提供的一个外部函数库 ctypes, 它提供了C语言兼容的几种数据类型,并且可以允许调用C编译好的库。
这里是阅读相关资料的一个记录,内容大部分来自官方文档。
数据类型
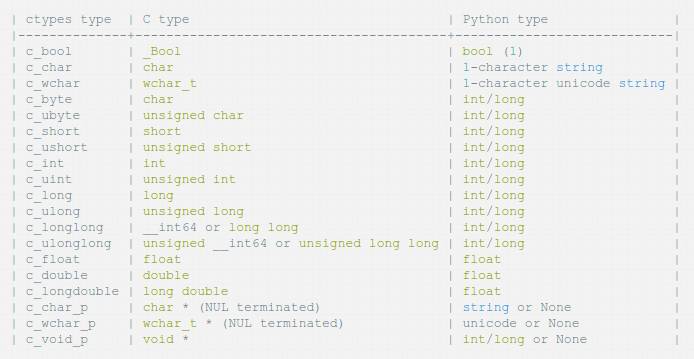
ctypes 提供了一些原始的C语言兼容的数据类型,参见下表,其中第一列是在ctypes库中定义的变量类型,第二列是C语言定义的变量类型,第三列是Python语言在不使用ctypes时定义的变量类型。

创建简单的ctypes类型如下:
>>> c_int()
c_long(0)
>>> c_char_p("Hello, World")
c_char_p('Hello, World')
>>> c_ushort(-3)
c_ushort(65533)
>>>
使用 .value 访问和改变值:
>>> i = c_int(42)
>>> print i
c_long(42)
>>> print i.value
42
>>> i.value = -99
>>> print i.value
-99
>>>
改变指针类型的变量值:
>>> s = "Hello, World"
>>> c_s = c_char_p(s)
>>> print c_s
c_char_p('Hello, World')
>>> c_s.value = "Hi, there"
>>> print c_s
c_char_p('Hi, there')
>>> print s # 一开始赋值的字符串并不会改变, 因为这里指针的实例改变的是指向的内存地址,不是直接改变内存里的内容
Hello, World
>>>
如果需要直接操作内存地址的数据类型:
>>> from ctypes import *
>>> p = create_string_buffer(3) # create a 3 byte buffer, initialized to NUL bytes
>>> print sizeof(p), repr(p.raw)
3 '\x00\x00\x00'
>>> p = create_string_buffer("Hello") # create a buffer containing a NUL terminated string
>>> print sizeof(p), repr(p.raw) # .raw 访问内存里存储的内容
6 'Hello\x00'
>>> print repr(p.value) # .value 访问值
'Hello'
>>> p = create_string_buffer("Hello", 10) # create a 10 byte buffer
>>> print sizeof(p), repr(p.raw)
10 'Hello\x00\x00\x00\x00\x00'
>>> p.value = "Hi"
>>> print sizeof(p), repr(p.raw)
10 'Hi\x00lo\x00\x00\x00\x00\x00'
>>>
下面的例子演示了使用C的数组和结构体:
>>> class POINT(Structure): # 定义一个结构,内含两个成员变量 x,y,均为 int 型
... _fields_ = [("x", c_int),
... ("y", c_int)]
...
>>> point = POINT(2,5) # 定义一个 POINT 类型的变量,初始值为 x=2, y=5
>>> print point.x, point.y # 打印变量
2 5
>>> point = POINT(y=5) # 重新定义一个 POINT 类型变量,x 取默认值
>>> print point.x, point.y # 打印变量
0 5
>>> POINT_ARRAY = POINT * 3 # 定义 POINT_ARRAY 为 POINT 的数组类型
# 定义一个 POINT 数组,内含三个 POINT 变量
>>> pa = POINT_ARRAY(POINT(7, 7), POINT(8, 8), POINT(9, 9))
>>> for p in pa: print p.x, p.y # 打印 POINT 数组中每个成员的值
...
7 7
8 8
9 9
创建指针实例
>>> from ctypes import *
>>> i = c_int(42)
>>> pi = pointer(i)
>>>
>>> pi.contents
c_long(42)
>>>
使用cast()类型转换
>>> class Bar(Structure):
... _fields_ = [("count", c_int), ("values", POINTER(c_int))]
...
>>> bar = Bar()
>>> bar.values = (c_int * 3)(1, 2, 3)
>>> bar.count = 3
>>> for i in range(bar.count):
... print bar.values[i]
...
1
2
3
>>>
>>> bar = Bar()
>>> bar.values = cast((c_byte * 4)(), POINTER(c_int)) # 这里转成需要的类型
>>> print bar.values[0]
0
>>>
类似于C语言定义函数时,会先定义返回类型,然后具体实现再定义,当遇到下面这种情况时,也需要这么干:
>>> class cell(Structure):
... _fields_ = [("name", c_char_p),
... ("next", POINTER(cell))]
...
Traceback (most recent call last):
File "", line 1, in ?
File "", line 2, in cell
NameError: name 'cell' is not defined
>>>
# 不能调用自己,所以得像下面这样
>>> from ctypes import *
>>> class cell(Structure):
... pass
...
>>> cell._fields_ = [("name", c_char_p),
... ("next", POINTER(cell))]
>>>
调用.so/.dll
可以简单地将”so”和”dll”理解成Linux和windows上动态链接库的指代,这里我们以Linux为例。注意,ctypes提供的接口会在不同系统上有出入,比如为了加载动态链接库, 在Linux上提供的是 cdll, 而在Windows上提供的是 windll 和 oledll 。
加载动态链接库
from ctypes import *
>>> cdll.LoadLibrary("libc.so.6")
CDLL 'libc.so.6', handle ... at ...>
>>> libc = CDLL("libc.so.6")
>>> libc
CDLL 'libc.so.6', handle ... at ...>
>>>
调用加载的函数
>>> print libc.time(None)
1150640792
>>> print hex(windll.kernel32.GetModuleHandleA(None))
0x1d000000
>>>
设置个性化参数
ctypes会寻找 _as_paramter_ 属性来用作调用函数的参数传入,这样就可以传入自己定义的类作为参数,示例如下:
>>> class Bottles(object):
... def __init__(self, number):
... self._as_parameter_ = number
...
>>> bottles = Bottles(42)
>>> printf("%d bottles of beer\n", bottles)
42 bottles of beer
19
>>>
指定函数需要参数类型和返回类型
用 argtypes 和 restype 来指定调用的函数返回类型。
>>> printf.argtypes = [c_char_p, c_char_p, c_int, c_double]
>>> printf("String '%s', Int %d, Double %fn", "Hi", 10, 2.2)
String 'Hi', Int 10, Double 2.200000
37
>>>
>>> strchr = libc.strchr
>>> strchr("abcdef", ord("d"))
8059983
>>> strchr.restype = c_char_p # c_char_p is a pointer to a string
>>> strchr("abcdef", ord("d"))
'def'
>>> print strchr("abcdef", ord("x"))
None
>>>
这里我只是列出了 ctypes 最基础的部分,还有很多细节请参考官方文档。
觉得本文对你有帮助?请分享给更多人
关注「Python开发者」
看更多Python技术文章


