上篇,Amusi带着大家学习了如何
浅入浅出TensorFlow 2 — 零基础安装
,今天继续给大家介绍linolzhang大佬的
TensorFlow系列课程
,带大家学习
MNIST手写体识别
。
正文
MNIST 手写体识别通常是神经网络入门的一个例子,每个Deep Learning框架 都有相关的Demo,作为快速入门学习的示例。
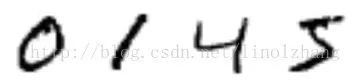
一. MNIST数据
MNIST为 0-9的手写阿拉伯数字,提供了6万的
训练集数据(mnist.train)
和 1万的
测试集数据(mnist.test)
。
下载地址:
http://
http://yann.lecun.com/exdb/mnist/index.html
如上图所示,有四个数字字符,每个字符的数据格式为 28*28的灰度图,图片表示为矩阵形式(有填充的地方为正值,无填充为0):
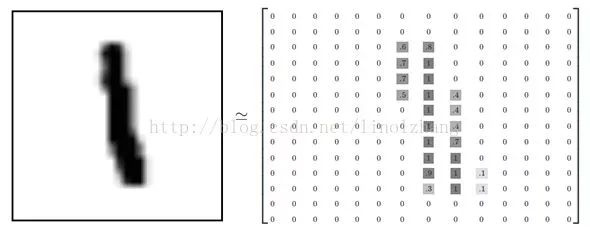
每个Data(数据)均包含对应标签 Label(Ground Truth),标签结果是一个10维的float数组,对应每个数字的概率:
0 -> [1,0,0,0,0,0,0,0,0,0 ]
5 -> [ 0,0,0,0,0,1,0,0,0,0 ]
即对应位的概率为 1,其他位为 0。
这样我们就得到了一组对应的 输入-输出,即 输入为 28*28=784维向量,输出为10维向量。
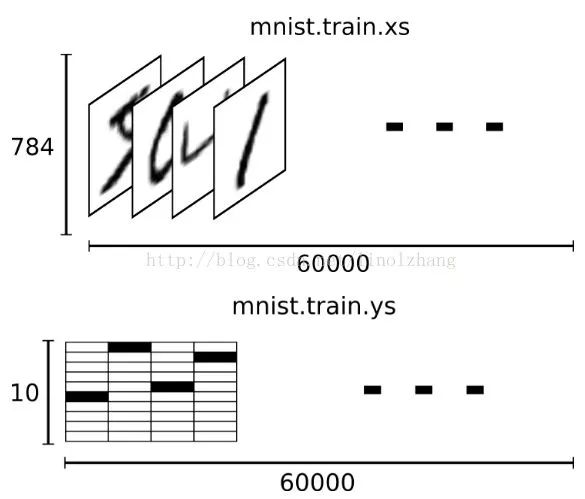
训练集的Data和Label如下所示:
二. MNIST网络结构
MNIST 采用LeNet-5,因Lecun而命名,该网络拓扑图结构(caffe结构图,看着比Tensor的清晰一些):

数据层 Data -> 隐层 Layer1 -> 隐层 Layer2 -> 全连接层 FC1 -> 全连接层 FC2 -> Loss | Accuracy
激活层根据需要添加,一般放在 Pooling层后面,这个就根据需要了。
三. TensorFlow运行
TensorFlow提供了MNIST 的例子,我们直接上Python代码,可以自己测试运行:
1
2import tensorflow as tf
3from tensorflow.examples.tutorials.mnist import input_data
4
5mnist = input_data.read_data_sets("MNIST_data/", one_hot=True)
6sess = tf.InteractiveSession()
7
8
9def weight_variable(para):
10
11 initial = tf.truncated_normal(para,stddev=0.1)
12 return tf.Variable(initial)
13
14def bias_variable(para):
15 initial = tf.constant(0.1, shape=para)
16 return tf.Variable(initial)
17
18
19def conv2d(x,W):
20 return tf.nn.conv2d( x,W,strides=[1,1,1,1],padding='SAME' )
21
22def max_pool_2(x):
23 return tf.nn.max_pool(x,ksize=[1,2,2,1
],strides=[1,2,2,1],padding='SAME')
24
25
26x = tf.placeholder(tf.float32, [None,784])
27
28x_input = tf.reshape(x, [-1,28,28,1])
29y_label = tf.placeholder(tf.float32, [None, 10])
30
31
32W_conv1 = weight_variable([5,5,1,32])
33b_conv1 = bias_variable([32])
34h_relu1 = tf.nn.relu(conv2d(x_input,W_conv1) + b_conv1)
35h_pool1 = max_pool_2(h_relu1)
36
37
38W_conv2 = weight_variable([5,5,32,64])
39b_conv2 = bias_variable([64])
40h_relu2 = tf.nn.relu(conv2d(h_pool1,W_conv2) + b_conv2)
41h_pool2 = max_pool_2(h_relu2)
42
43
44W_fc1 = weight_variable([7*7*64,1024])
45b_fc1 = bias_variable([1024])
46h_pool2_flat = tf.reshape(h_pool2, [-1,7*7*64])
47h_fc1 = tf.nn.relu(tf.matmul(h_pool2_flat, W_fc1) + b_fc1)
48
49
50keep_prob = tf.placeholder(tf.float32)
51drop_fc1 = tf.nn.dropout(h_fc1,keep_prob)
52
53
54W_fc2 = weight_variable([1024,10])
55b_fc2 = bias_variable([10])
56y = tf.nn.softmax(tf.matmul(drop_fc1,W_fc2) + b_fc2)
57
58
59cross_entropy = tf.reduce_mean(-tf.reduce_sum(y_label*tf.log(y),reduction_indices=[1]))
60train_step = tf.train.AdamOptimizer(0.001).minimize(cross_entropy)
61
62
63correct_pred = tf.equal(tf.argmax(y,1), tf.argmax(y_label,1))
64accuracy = tf.reduce_mean(tf.cast(correct_pred,tf.float32))
65