背景
近期在做内部系统的重构,从一线业务彻底的重构,经过充分的考虑我们准备把这个项目打造成前台业务的试验站,比如ssr和一些其他的前沿技术的探索,积累充分的经验后待合适的契机应用到C端的项目中。 既然涉及到重构,避免不了老生常谈的话题技术选型。当然开始还是走了一些弯路,因为是后台项目,最重要的当然是快速迭代,基于此在UI层我们准备使用开源的方案,目前社区比较成熟的两种UI库(antdesign、elementUI)我们拿给UI同学对比,UI同学还是比较倾向于antdesign的,所以我们开始尝试了几个社区的react ssr方案,可能是使用姿势不对或者其他原因,发现打出来的bundle都比较大,这个不是我们期望的...
从新出发,我们的根本目的是要把这个后台项目打造成试验站,必然要本着C端项目的技术栈着手,C端的技术栈是基于VUE的,所以开始调研vue ssr的方案,UI库使用elementUI,部分样式重写,整体风格像antdesign靠拢...从社区找到了nuxt.js方案,写了几个demo页面测试渲染性能非常符合预期,而且多页面方案和我们的C端项目是可以无缝接入的,撸起袖子开干!
nuxt.js
下面贴出官网的简介,官网链接nuxtjs.org
The 25th of October 2016, the team behind zeit.co, announced Next.js, a framework for server-rendered React applications. Few hours after the announcement, the idea of creating server-rendered Vue.js applications the same way as Next.js was obvious: Nuxt.js was born.
一个健壮的方案,我觉得必备的就是单元测试的覆盖率,那今天就从nuxt.js单元测试入手 首先贴一个官网给出的运行机制示意图
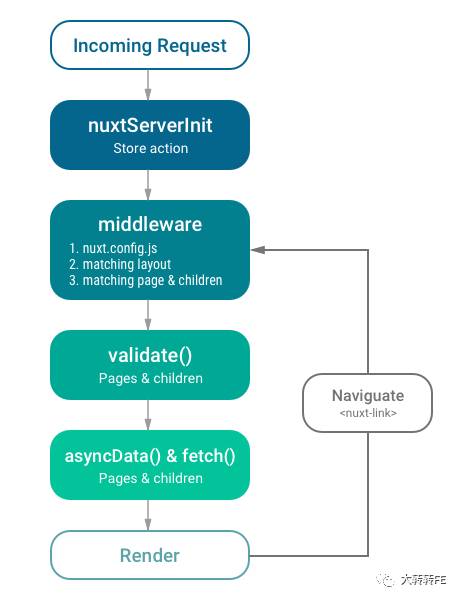
从图中可以看出比较重要的就是ta的middleware,第一步呢就是ta的配置文件nuxt.config.js,别说话直接看代码(链接)
// Init nuxt.js and create server listening on localhost:4000
test.before('Init Nuxt.js', async t => {
const Nuxt = require('../')
const rootDir = resolve(__dirname, 'fixtures/with-config')
let config = require(resolve(rootDir, 'nuxt.config.js'))
config.rootDir = rootDir
config.dev = false
nuxt = new Nuxt(config)
await nuxt.build()
server = new nuxt.Server(nuxt)
server.listen(port, 'localhost')
})
从这段测试case可以看到是加载了一个配置文件,如下(链接)
module.exports = {
srcDir: __dirname,
router: {
base: '/test/',
middleware: 'noop',
extendRoutes (routes) {
routes.push({
name: 'about-bis',
path: '/about-bis',
component: '~pages/about.vue'
})
}
},
transition: 'test',
offline: true,
plugins: [
'~plugins/test.js',
{ src: '~plugins/offline.js', ssr: false },
{ src: '~plugins/only-client.js', ssr: false }
],
loading: '~components/loading',
env: {
bool: true,
num: 23,
string: 'Nuxt.js'
},
build: {
extractCSS: true,
publicPath: '/orion/',
analyze: {
analyzerMode: 'disabled',
generateStatsFile: true
},
extend (config, options) {
config.devtool = 'nosources-source-map'
}
},
css: [
{ src: '~/assets/app.css' }
],
render: {
static: {
maxAge: '1y'
}
}
}
因为框架最近有比较大的升级,所以官网文档还没有更新到位,有些东西只能从源码入手,比如配置文件...
从上面代码可以清楚看到我们可以配置哪些项,怎么配置,比如引入公共类库、引入中间件、打包等等
ta是如何加载中间件的呢(链接)
class Module {
constructor (nuxt) {
this.nuxt = nuxt
this.options = nuxt.options
this.modules = []
this.initing = this.ready()
}
async ready () {
if (this.initing) {
await this.initing
return this
}
// Install all modules in sequence
await sequence(this.options.modules, this.addModule.bind(this))
return this
}
...
}
看到sequence这个函数大家应该就懂了吧,序列化配置项里面的modules...逐个加载,至于加载机制可以看到调用了addModule方法,以及其他的内容,我们下期在做分析,最后我们还看到了经典的return this...
好了因为是初探,本期主要介绍配置项,先介绍到这里,继续码砖了:)


