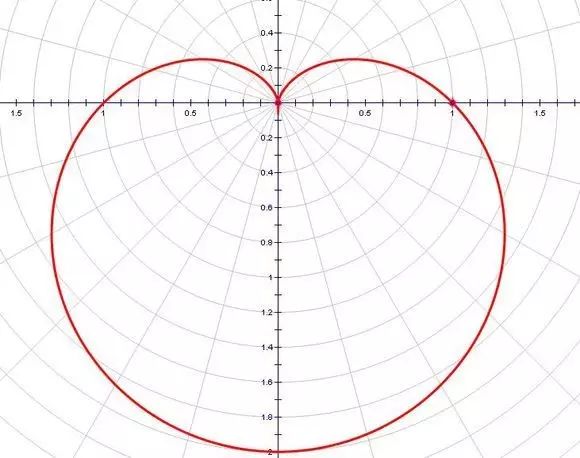
1650年,斯德哥尔摩街头,一个宁静的午后,笛卡尔邂逅了18岁的瑞典公主克里斯汀。然而,没过多久,他们的恋情传到了国王的耳朵里。国王大怒,将笛卡尔放逐,而公主被软禁在宫中。 身体孱弱的笛卡尔不久便染上重病,在生命进入倒计时的那段日子,他日夜思念的还是街头偶遇的那张温暖的笑脸。他每天坚持给她写信,盼望着她的回音。然而,这些信都被国王拦截下来。在笛卡尔给克里斯汀寄出第十三封信后,他永远地离开了这个世界。此时,被软禁在宫中的小公主依然徘徊在皇宫的走廊里,思念着远方的情人。
这最后一封信上没有写一句话,只有一个方程:r=a(1-sinθ) ——传说中著名的心形函数。

不过,事实告诉我们,除非你的目标妹子也是一只Geeker(至少会用Mathematica或者MATLAB等软件),否则像笛卡尔这样单给一个函数的结局大概就是你推公式别人推妹子了……表白什么的还是选择更浅显易懂的方法吧。
接下来看看用各种数据分析软件做出的心形模型,保证亮瞎你的表白对象!
在这个特殊的日子里,特意搜集了利用Stata绘制心形线的程序,代码如下:
gen y=13*cos(t)-5*cos(2*t)-2*cos(3*t)-cos(4*t)gen a=(x-x_min)/(x_max-x_min)gen b=(y-y_min)/(y_max-y_min)gr_edit yaxis1.draw_view.setstyle, style(no)gr_edit xaxis1.draw_view.setstyle, style(no)gr_edit plotregion1.AddTextBox added_text editor .7055394244311991 .2810707216715078gr_edit plotregion1.added_text_new = 1gr_edit plotregion1.added_text_rec = 1gr_edit plotregion1.added_text[1].style.editstyle angle(default) size(medsmall) color(red) horizontal(left) vertical(middle) margin(zero) linegap(zero) drawbox(no) boxmargin(zero) fillcolor(bluishgray) linestyle( width(thin) color(red) pattern(solid)) box_alignment(east) editcopygr_edit plotregion1.added_text[1].style.editstyle size(large) editcopygr_edit plotregion1.added_text[1].text = {}gr_edit plotregion1.added_text[1].text.Arrpush " I LOVE YOU"graph export "C:\Desktop\520.png", as(png) wid(800)hei(600) replace
以下为输出结果:
以上程序基于stata12运行,如果有stata14的话,还可以输入中文!祝大家好运!
接下来是R绘制心形线,代码如下:
heart y=13*cos(t)-5*cos(2*t)-2*cos(3*t)-cos(4*t) a=(x-min(x))/(max(x)-min(x)) b=(y-min(y))/(max(y)-min(y)) grid.lines(a,b,gp=gpar(col=lcolor,lty = "solid",lwd = 6))grid.newpage()
grid.circle(x=0.5, y=0.5, r=0.5,gp=gpar(fill="red",lwd = 3)) vp grid.polygon(x=c(0.08, .5, 0.94),y=c(.22, 1.03, .22),gp=gpar(lwd = vp2 grid.circle(x=0.5, y=0.5, r=0.5,gp=gpar(fill="red",lwd = 3)) vp3 grid.polygon(x=c(0.08, .5, 0.94),y=c(.22, 1.03, .22),gp=gpar(lwd = 3))}pushViewport(viewport(x=0.1, y=0.1,w=0.2, h=0.2)) vp vp1 vp2 x=0.2,y =1.2, just = c("center", "bottom"), gp = gpar(fontsize=30), vp = vp)
结果如下:

注:操作平台为Rstudio,由于手头电脑没有装R,所以上述程序没有验证,就交给大家自己实践了!祝好运!
以上程序来自:
http://mp.weixin.qq.com/s?__biz=MzA4NTAyMjQ2Mg==&mid=206788501&idx=1&sn=53e07723fdb395a787e57ea53bffd332&scene=21#wechat_redirect
利用matlab抱得美人归:
f=@(x,y,z) x.^2.*z.^3+9*y.^2.*z.^3/80-(x.^2+9*y.^2/4+z.^2-1).^3;%心形曲面函数
[x,y,z]=meshgrid(-1.5:0.1:1.5);%画图范围
h=patch(isosurface(x,y,z,v,0));
set(h,'FaceColor','r','EdgeColor','none');
title('Programmed By Dylan Wang')
axis([-1.5 1.5 -1.5 1.5 -1.5 1.5])
效果如斯:

x = -.01*(-t**2+40*t+1200)*sin(pi*t/180);y = .01*(-t**2+40*t+1200)*cos(pi*t/180);
2)准备图形上的文字
这个最重要,字一定要大,而且千万记得署上自己的名字。过年的时候收到几条没有署名的祝福短信,郁闷的我也不知道该怎么问人家名字。
input textsize y1 function :$8. label $40.;retain drawspace "GRAPHPERCENT"ods graphics / width=600px height=600px noborder;proc sgplot data=heart sganno=anno noautolegend;
title "Heart";
series x=x y=y /group=side lineattrs=(color=red);
用SAS画曲线有多种方式:
1)用ScatterPlot画图是最自然的方式,不过需要10000个点心形图看上去才比较舒服。因为曲线的边有些锯齿,所以我不太喜欢。2)用Series画图,这个需要点技巧。对数据不做特殊处理的话,画出来的是这样,不过也很美很特别。
Heart

3)我建议大家动手试试其他的语句,比如pbsplineplot,会有各种惊喜。

为了能出下面这个心形图,我特意加了side变量,然后通过lineattrs=(color=red)强行将两组数据用红色画线,而不是默认的一蓝一红。

Do you love SAS? Yes, I DO.(行动才是爱!)
爱心的python表示:
1.第一种
'17*x^2 - 16*|x|*y + 17*y^2 = 225'import matplotlib.pyplot as pltX = np.arange(-5.0, 5.0, 0.1)Y = np.arange(-5.0, 5.0, 0.1)f = 17 * x ** 2 - 16 * np.abs(x) * y + 17 * y ** 2 - 225cs = plt.contour(x, y, f, 0, colors = 'r')

2.第二种
'(x^2+y^2+y)^2 = x^2 + y^2'import matplotlib.pyplot as pltX = np.arange(-2.0, 2.0, 0.05)Y = np.arange(-2.0, 2.0, 0.05)f = (x ** 2 + y ** 2 + y) ** 2 - x ** 2 - y ** 2cs = plt.contour(x, y, f, 0, colors = 'r')

3.第三种
'8*x^2 - 9*|x|*y + 8*y^2 = 17'import matplotlib.pyplot as pltX = np.arange(-2.5, 2.5, 0.05)Y = np.arange(-2.5, 2.5, 0.05)f = 8 * x ** 2 - 9 * np.abs(x) * y + 8 * y ** 2 - 17cs = plt.contour(x, y, f, 0, colors = 'r')

4.第四种
'(x^2 + y^2 - 1)^3 - x^2*y^3 = 0'import matplotlib.pyplot as pltX = np.arange(-2.0, 2.0, 0.05)Y = np.arange(-2.0, 2.0, 0.05)f = (x ** 2 + y ** 2 - 1) ** 2 * (x ** 2 + y ** 2 - 1)- x ** 2 * y ** 2 * ycs = plt.contour(x, y, f, 0, colors = 'r')

最后,感谢那些做出巨大贡献的程序猿,没有他们的代码,表白怎能如此风骚!!!


