阅读源码之路终于开启了, 小白一枚, 大神们要多多照顾啊, 有什么建议可以评论或私信, 在此多谢了!!!!
概要
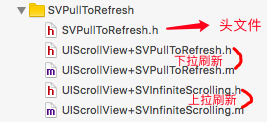
文件结构
文章目录
1.前言
作为一个刷新框架,
SVPullToRefresh
以其简洁, 通俗易懂为大家所推崇. 对于刚开始读源码的我来说, 再合适不过了, 而且最近正在做一个刷新demo, 用到, 顺便整理一下, 学习学习.
SV是个熟悉的前缀, 就算没听过
SVPullToRefresh
, 也听过
SVProgressHUD
吧. 除了这些, 作者
Sam
还有其他优秀的开源代码, 大家感兴趣可以看看.
2.API说明
2.1 下拉刷新
下拉刷新ScrollView
@class SVPullToRefreshView;
@interface UIScrollView (SVPullToRefresh)
typedef NS_ENUM(NSUInteger, SVPullToRefreshPosition) {
SVPullToRefreshPositionTop = 0,
SVPullToRefreshPositionBottom,
};
//默认添加方法, position为top
- (void)addPullToRefreshWithActionHandler:(void (^)(void))actionHandler;
/*
自定义添加下拉刷新的方法, 可以改变刷新方式;
top为下拉刷新, bottom为上拉刷新;
*/
- (void)addPullToRefreshWithActionHandler:(void (^)(void))actionHandler position:(SVPullToRefreshPosition)position;
//触发一次刷新, 会执行handler这个block里面的方法
- (void)triggerPullToRefresh;
//下拉刷新视图
@property (nonatomic, strong, readonly) SVPullToRefreshView *pullToRefreshView;
//是否展示下拉刷新视图(须在addPullToRefreshWithActionHandler:方法后面)
@property (nonatomic, assign) BOOL showsPullToRefresh;
@end
下拉刷新View
//只保留可更改选项
@interface SVPullToRefreshView : UIView
//下拉刷新箭头颜色
@property (nonatomic, strong) UIColor *arrowColor;
//文本颜色
@property (nonatomic, strong) UIColor *textColor;
//指示器view颜色
@property (nonatomic, strong, readwrite) UIColor *activityIndicatorViewColor NS_AVAILABLE_IOS(5_0);
//指示器类型
@property (nonatomic, readwrite) UIActivityIndicatorViewStyle activityIndicatorViewStyle;
//根据刷新状态设置标题
- (void)setTitle:(NSString *)title forState:(SVPullToRefreshState)state;
//根据刷新状态设置副标题
- (void)setSubtitle:(NSString *)subtitle forState:(SVPullToRefreshState)state;
//根据刷新状态设置自定义View
- (void)setCustomView:(UIView *)view forState:(SVPullToRefreshState)state;
//开始动画
- (void)startAnimating;
//结束动画
- (void)stopAnimating;
//最后更新日期(NSDate)
@property (nonatomic, strong) NSDate *lastUpdatedDate DEPRECATED_ATTRIBUTE;
//日期格式(NSDateFormatter)
@property (nonatomic, strong) NSDateFormatter *dateFormatter DEPRECATED_ATTRIBUTE;
@end
是我自己测试的, 把所有属性玩了一遍, 亲测好用, O(∩_∩)O哈哈~
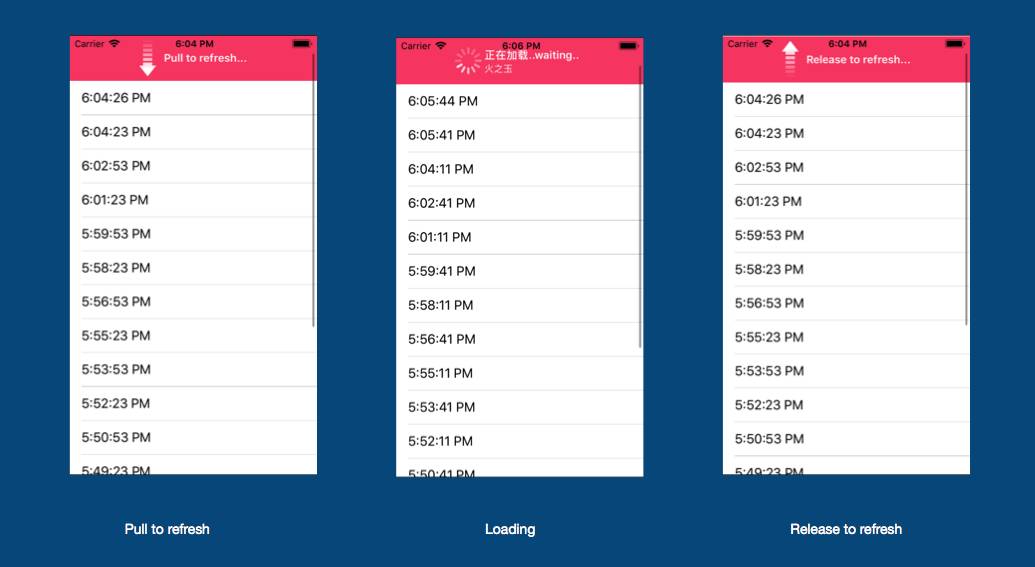
下拉测试效果图
[self.tableView addPullToRefreshWithActionHandler:^{
//下拉刷新数据
}];
self.tableView.pullToRefreshView.backgroundColor = RedColor;
self.tableView.pullToRefreshView.arrowColor = [UIColor whiteColor];
self.tableView.pullToRefreshView.textColor = [UIColor whiteColor];
[self.tableView.pullToRefreshView setSubtitle:@"火之玉" forState:SVInfiniteScrollingStateLoading];
[self.tableView.pullToRefreshView setTitle:@"正在加载..waiting.." forState:SVInfiniteScrollingStateLoading];
self.tableView.pullToRefreshView.activityIndicatorViewColor = BlueColor;
self.tableView.pullToRefreshView.activityIndicatorViewStyle = UIActivityIndicatorViewStyleWhiteLarge;
// UIView *pullView = [[UIView alloc] initWithFrame:CGRectMake(0, 0, 50, 50)];
// pullView.backgroundColor = [UIColor cyanColor];
// [self.tableView.pullToRefreshView setCustomView:pullView forState:SVPullToRefreshStateAll];
2.2 上拉刷新
上拉刷新ScrollView
@class SVInfiniteScrollingView;
@interface UIScrollView (SVInfiniteScrolling)
//默认添加上拉刷新视图
- (void)addInfiniteScrollingWithActionHandler:(void (^)(void))actionHandler;
////触发一次刷新, 会执行handler这个block里面的方法
- (void)triggerInfiniteScrolling;
//上拉刷新视图
@property (nonatomic, strong, readonly) SVInfiniteScrollingView *infiniteScrollingView;
//是否展示上拉刷新视图
@property (nonatomic, assign) BOOL showsInfiniteScrolling;
@end
上拉刷新View
@interface SVInfiniteScrollingView : UIView
//指示器类型
@property (nonatomic, readwrite) UIActivityIndicatorViewStyle activityIndicatorViewStyle;
//刷新状态
@property (nonatomic, readonly) SVInfiniteScrollingState state;
//是否取消上拉加载
@property (nonatomic, readwrite) BOOL enabled;
//根据刷新状态设置自定义View
- (void)setCustomView:(UIView *)view forState:(SVInfiniteScrollingState)state;
//开始动画
- (void)startAnimating;
//结束动画
- (void)stopAnimating;
@end
附上测试效果:
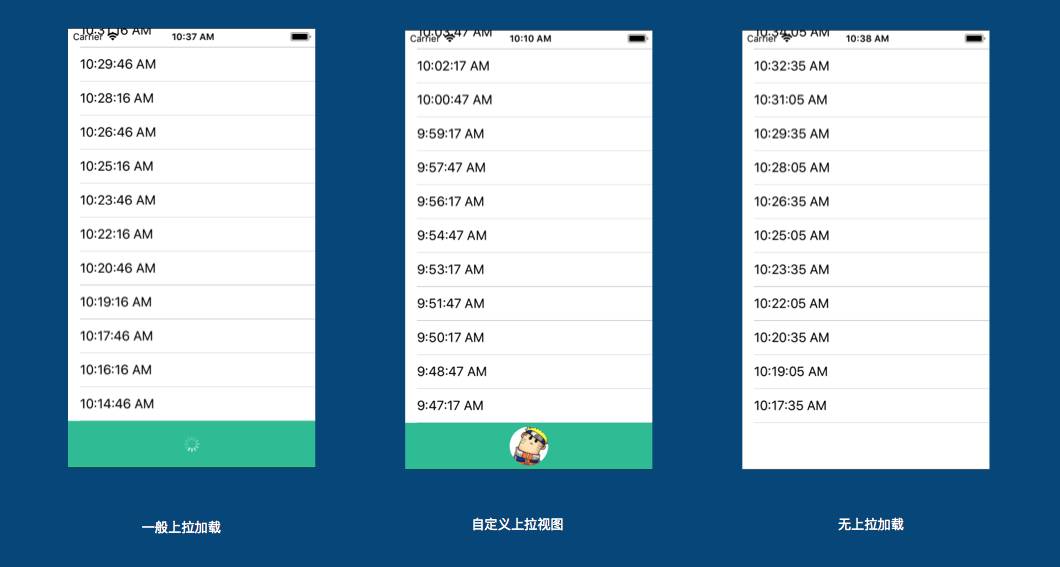
上拉测试效果图
// setup infinite scrolling
[self.tableView addInfiniteScrollingWithActionHandler:^{
//上拉刷新数据
}];
self.tableView.infiniteScrollingView.backgroundColor = BlueColor;
self.tableView.infiniteScrollingView.activityIndicatorViewStyle = UIActivityIndicatorViewStyleWhite;
// UIImageView *pullImageView = [[UIImageView alloc] initWithFrame:CGRectMake(0, 0, 50, 50)];
// pullImageView.image = [UIImage imageNamed:@"avatar"];
// pullImageView.layer.cornerRadius = 25;
// pullImageView.layer.masksToBounds = YES;
// [self.tableView.infiniteScrollingView setCustomView:pullImageView forState:SVPullToRefreshStateAll];
//
// self.tableView.infiniteScrollingView.enabled = NO;
3.原理解析
3.1 下拉刷新
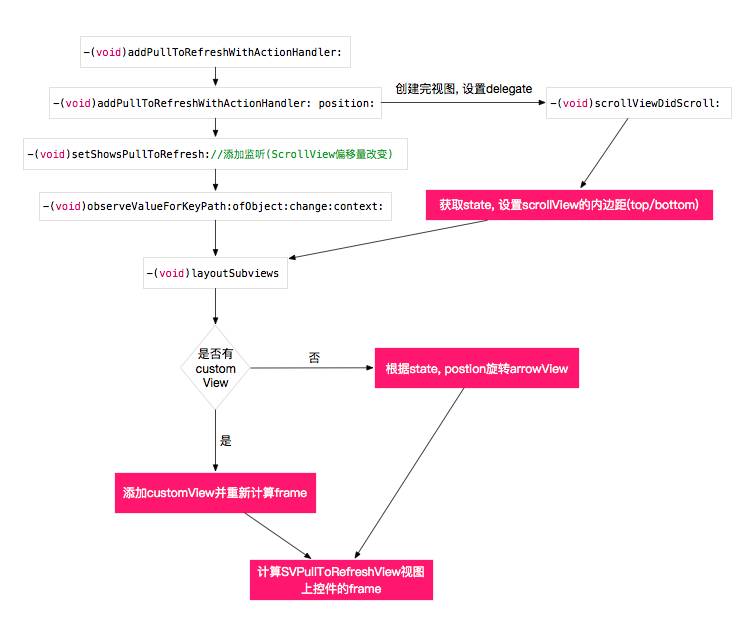
下拉刷新流程图
以上是下拉刷新的主要流程图, 接下来我们就来扣扣细节;
3.1.1 -(void)triggerPullToRefresh触发了一次刷新:
以下是方法的内部实现;
- (void)triggerPullToRefresh {
self.pullToRefreshView.state = SVPullToRefreshStateTriggered;
[self.pullToRefreshView startAnimating];
}
看了一眼, 当时就懵了; 怎么就这点儿代码, 完全看不出来啊, 别着急, 接着一个个点进去看. 发现state属性的setter方法里面做了处理;
- (void)setState:(SVPullToRefreshState)newState {
if(_state == newState)
return;
SVPullToRefreshState previousState = _state;
_state = newState;
[self setNeedsLayout];
[self layoutIfNeeded];
switch (newState) {
case SVPullToRefreshStateAll:
case SVPullToRefreshStateStopped:
[self resetScrollViewContentInset];
break;
case SVPullToRefreshStateTriggered:
break;
case SVPullToRefreshStateLoading:
[self setScrollViewContentInsetForLoading];
if(previousState == SVPullToRefreshStateTriggered && pullToRefreshActionHandler)
pullToRefreshActionHandler();
break;
}
}
接下来拆分一下:
self.pullToRefreshView.state = SVPullToRefreshStateTriggered;
执行完这步代码, 执行一次-(void)setState:, 之后break跳出;
[self.pullToRefreshView startAnimating];
这步pullToRefreshView执行-(void)startAnimating, 方法内部实现如下:
- (void)startAnimating{
...
self.state = SVPullToRefreshStateLoading;
}
可以看出之后又执行了一次-(void)setState:, 这时previousState == SVPullToRefreshStateTriggered条件满足, 执行infiniteScrollingHandler(), 也就执行了block里面刷新数据的方法;
3.1.2 利用runtime+KVO添加成员变量
代码如下:
static char UIScrollViewPullToRefreshView;
- (void)setPullToRefreshView:(SVPullToRefreshView *)pullToRefreshView {
[self willChangeValueForKey:@"SVPullToRefreshView"];
objc_setAssociatedObject(self, &UIScrollViewPullToRefreshView,
pullToRefreshView,
OBJC_ASSOCIATION_ASSIGN);
[self didChangeValueForKey:@"SVPullToRefreshView"];
}
- (SVPullToRefreshView *)pullToRefreshView {
return objc_getAssociatedObject(self, &UIScrollViewPullToRefreshView);
}
关于KVO:
从代码中可以看出willChangeValueForKey :和didChangeValueForKey :是KVO的一部分, 源文件的代码为:
@interface NSObject(NSKeyValueObserverNotification)
- (void)willChangeValueForKey:(NSString *)key;
- (void)didChangeValueForKey:(NSString *)key;
@end
用了这两个方法也就代表手动触发了KVO, 这也为了控制回调的调用时机, 在setPullToRefreshView:中触发. 而手动触发的场景一般是不使用属性,或重写了setter,需要手动通知系统.
一般我们是不需要用的, 比如@property写一个属性, 系统会以某种方式在中间插入 wilChangeValueForKey: 、 didChangeValueForKey: 和 observeValueForKeyPath:ofObject:change:context: 的调用.
想要了解更多, 可以看一下
KVO Programming Guide - Apple官方文档
关于runtime:
这里要知道这两个方法:
//set
objc_setAssociatedObject(id _Nonnull object, const void * _Nonnull key,
id _Nullable value, objc_AssociationPolicy policy)
//get
objc_getAssociatedObject(id _Nonnull object, const void * _Nonnull key)
//objc_AssociationPolicy类型说明
//关联时采用的协议,有assign,retain,copy等协议,一般使用OBJC_ASSOCIATION_RETAIN_NONATOMIC
typedef OBJC_ENUM(uintptr_t, objc_AssociationPolicy) {
OBJC_ASSOCIATION_ASSIGN = 0, /**< Specifies a weak reference to the associated object. */
OBJC_ASSOCIATION_RETAIN_NONATOMIC = 1, /**< Specifies a strong reference to the associated object.
* The association is not made atomically. */
OBJC_ASSOCIATION_COPY_NONATOMIC = 3, /**< Specifies that the associated object is copied.
* The association is not made atomically. */
OBJC_ASSOCIATION_RETAIN = 01401, /**< Specifies a strong reference to the associated object.
* The association is made atomically. */
OBJC_ASSOCIATION_COPY = 01403 /**< Specifies that the associated object is copied.
* The association is made atomically. */
};
看完所有API, 其实也了解的差不多, 这样就给scrollView增加了一个SVPullToRefreshView类型的属性;
3.1.3 监听探究
这里主要涉及scrollView的三个监听, contentOffset, contentSize, frame;
frame就不用说了, 说一下另外两个;
contentOffset是scrollview当前显示区域顶点相对于frame顶点的偏移量。可以理解为contentview的顶点相对于scrollerVIew的frame的偏移量;
contentSize是scrollview当前所有内容区域的大小;
顺便提下contentInset, 下面用到, 表示contentView.frame与scrollerView.frame的关系, 可以类比于css里的padding.
例如:
testScrollView.contentInset = UIEdgeInsetsMake(10, 10, 10, 10);
则testScrollView的top, left, bottom, right为10;
好了, 现在到重头戏了, 监听如何执行的, 代码如下:
#pragma mark - Observing
- (void)observeValueForKeyPath:(NSString *)keyPath ofObject:(id)object change:(NSDictionary *)change context:(void *)context {
if([keyPath isEqualToString:@"contentOffset"])
[self scrollViewDidScroll:[[change valueForKey:NSKeyValueChangeNewKey] CGPointValue]];
else if([keyPath isEqualToString:@"contentSize"]) {
[self layoutSubviews];
CGFloat yOrigin;
...
self.frame = CGRectMake(0, yOrigin, self.bounds.size.width, SVPullToRefreshViewHeight);
}
else if([keyPath isEqualToString:@"frame"])
[self layoutSubviews];
}
可以理解为当监听contentOffset改变时, scrollView滚动, 此时执行scrollViewDidScroll:方法得到此时的滚动state; 当为contentSize和frame时, scrollView视图发生变化, 此时执行layoutSubviews重新加载视图, 包括根据状态改变视图样式, 都在这里面执行;
scrollViewDidScroll:
方法
:
- (void)scrollViewDidScroll:(CGPoint)contentOffset {
if(self.state != SVPullToRefreshStateLoading) {
CGFloat scrollOffsetThreshold = 0;
switch (self.position) {
case SVPullToRefreshPositionTop:
scrollOffsetThreshold = self.frame.origin.y - self.originalTopInset;
break;
case SVPullToRefreshPositionBottom:
scrollOffsetThreshold = MAX(self.scrollView.contentSize.height - self.scrollView.bounds.size.height, 0.0f) + self.bounds.size.height + self.originalBottomInset;
break;
}
if(!self.scrollView.isDragging && self.state == SVPullToRefreshStateTriggered)
self.state = SVPullToRefreshStateLoading;
else if(contentOffset.y < scrollOffsetThreshold && self.scrollView.isDragging && self.state == SVPullToRefreshStateStopped && self.position == SVPullToRefreshPositionTop)
self.state = SVPullToRefreshStateTriggered;
else if(contentOffset.y >= scrollOffsetThreshold && self.state != SVPullToRefreshStateStopped && self.position == SVPullToRefreshPositionTop)
self.state = SVPullToRefreshStateStopped;
else if(contentOffset.y > scrollOffsetThreshold && self.scrollView.isDragging && self.state == SVPullToRefreshStateStopped && self.position == SVPullToRefreshPositionBottom)
self.state = SVPullToRefreshStateTriggered;
else if(contentOffset.y <= scrollOffsetThreshold && self.state != SVPullToRefreshStateStopped && self.position == SVPullToRefreshPositionBottom)
self.state = SVPullToRefreshStateStopped;
} else {
CGFloat offset;
UIEdgeInsets contentInset;
switch (self.position) {
case SVPullToRefreshPositionTop:
...
self.scrollView.contentInset = UIEdgeInsetsMake(offset, contentInset.left, contentInset.bottom, contentInset.right);
break;
case SVPullToRefreshPositionBottom:
if (self.scrollView.contentSize.height >= self.scrollView.bounds.size.height) {
...
self.scrollView.contentInset = UIEdgeInsetsMake(contentInset.top, contentInset.left, offset, contentInset.right);
} else if (self.wasTriggeredByUser) {
...
self.scrollView.contentInset = UIEdgeInsetsMake(-offset, contentInset.left, contentInset.bottom, contentInset.right);
}
break;
}
}
}
可以看出根据postion位置, state是SVPullToRefreshStateLoading状态的时候, 改变scrollView的contentInset;非该状态的时候, 根据contentOffset和postion设置state;
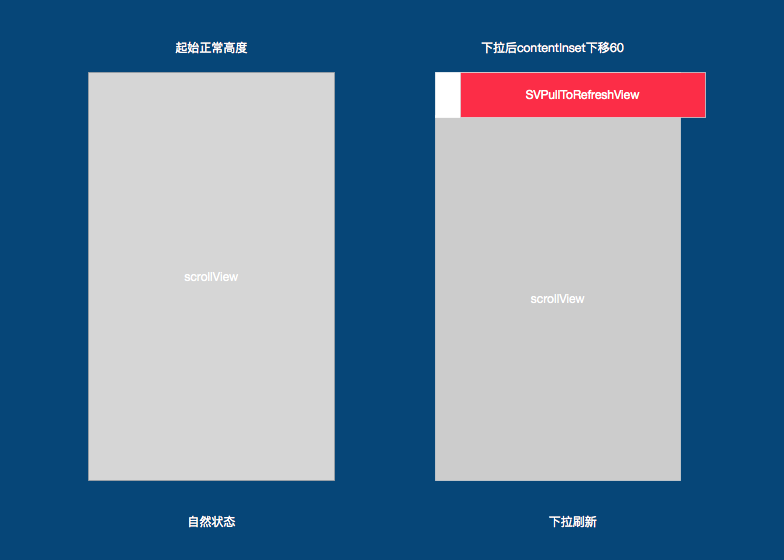
下拉刷新后, scrollView的内容高度下移60; 当然只是内容高度, 整个scrollView还是全屏的, 对比css中padding理解一下;
注:
SVPullToRefreshView向右移动一点儿距离, 方便看视图层级;
layoutSubviews
方法
:
- (void)layoutSubviews {
for(id otherView in self.viewForState) {
if([otherView isKindOfClass:[UIView class]])