主要观点总结
本文主要介绍了一个社群平台,提供了交流、面试、简历优化、求职解惑等服务,并分享了部分开源项目和代码。文章包含了OAuth2.0的介绍、代码搭建、测试结果等关键内容。
关键观点总结
关键观点1: 社群平台介绍
该社群平台为用户提供了一对一交流、面试小册、简历优化、求职解惑等服务,并鼓励用户加入其知识星球平台。
关键观点2: 开源项目分享
介绍了国产的开源项目,包括前端管理后台、微信小程序、后端支持单体和微服务架构等功能,并提供了相关仓库链接。
关键观点3: OAuth2.0介绍
详细解释了OAuth 2.0的核心概念和流程,包括角色定义和授权类型。
关键观点4: 代码搭建
通过具体的代码示例,介绍了如何配置Spring Boot + MyBatis Plus + Vue & Element实现的后台管理系统,包括用户小程序等功能。
关键观点5: 测试结果
展示了访问授权端、获取令牌、访问资源中心的过程和结果,包括未携带令牌和携带令牌的测试结果。
正文
👉
这是一个或许对你有用
的社群
🐱
一对一交流/面试小册/简历优化/求职解惑,欢迎加入
「
芋道快速开发平台
」
知识星球。
下面是星球提供的部分资料:
👉
这是一个或许对你有用的开源项目
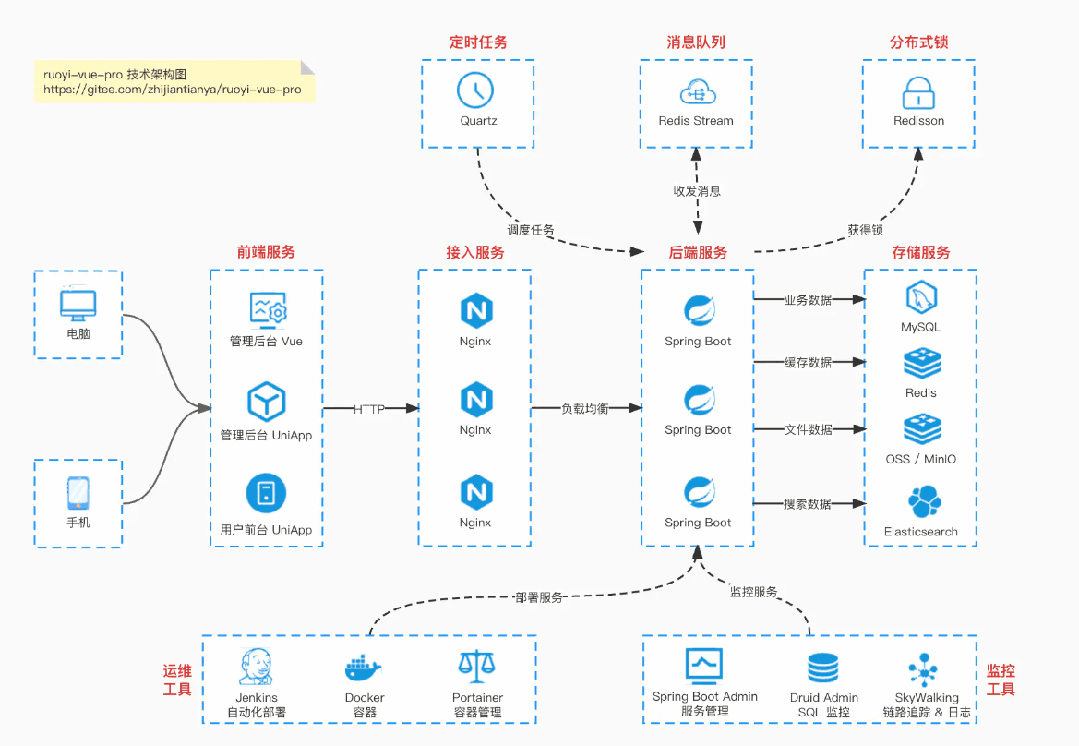
国产 Star 破 10w+ 的开源项目,前端包括管理后台 + 微信小程序,后端支持单体和微服务架构。
功能涵盖 RBAC 权限、SaaS 多租户、数据权限、商城、支付、工作流、大屏报表、微信公众号等等功能:
-
Boot 仓库:https://gitee.com/zhijiantianya/ruoyi-vue-pro
-
Cloud 仓库:https://gitee.com/zhijiantianya/yudao-cloud
-
视频教程:https://doc.iocoder.cn
【国内首批】支持 JDK 21 + SpringBoot 3.2.2、JDK 8 + Spring Boot 2.7.18 双版本
来源:blog.csdn.net/qq_43649937

OAuth 2.0(开放授权 2.0)是一个开放标准,用于授权第三方应用程序访问用户在资源所有者(用户)的帐户上存储的受保护资源,而无需共享用户凭据。OAuth 2.0 主要用于在互联网上安全地委托授权,广泛应用于身份验证和授权场景。
以下是 OAuth 2.0 的核心概念和流程:
-
资源所有者(Resource Owner):
拥有受保护资源的用户。
-
客户端(Client):
第三方应用程序,希望访问资源所有者的受保护资源。
-
授权服务器(Authorization Server):
负责验证资源所有者并颁发访问令牌的服务器。
-
资源服务器(Resource Server):
存储受保护资源的服务器,它可以与授权服务器相同,也可以是不同的服务器。
OAuth2.0协议一共支持 4 种不同的授权模式:
-
授权码模式:
常见的第三方平台登录功能基本都是使用这种模式。

-
简化模式:
简化模式是不需要客户端服务器参与,直接在浏览器中向授权服务器申请令牌(token),一般如果网站是纯静态页面则可以采用这种方式。

-
密码模式:
密码模式是用户把用户名密码直接告诉客户端,客户端使用说这些信息向授权服务器申请令牌(token)。这需要用户对客户端高度信任,例如客户端应用和服务提供商就是同一家公司,自己做前后端分离登录就可以采用这种模式。

-
客户端模式:
客户端模式是指客户端使用自己的名义而不是用户的名义向服务提供者申请授权,严格来说,客户端模式并不能算作 OAuth 协议要解决的问题的一种解决方案,但是,对于开发者而言,在一些前后端分离应用或者为移动端提供的认证授权服务器上使用这种模式还是非常方便的。

基于 Spring Boot + MyBatis Plus + Vue & Element 实现的后台管理系统 + 用户小程序,支持 RBAC 动态权限、多租户、数据权限、工作流、三方登录、支付、短信、商城等功能
-
项目地址:https://github.com/YunaiV/ruoyi-vue-pro
-
视频教程:https://doc.iocoder.cn/video/
导入依赖
<dependencies>
    <dependency>
        <groupId>org.springframework.bootgroupId>
        <artifactId>spring-boot-starter-webartifactId>
    dependency>
    <dependency>
        <groupId>org.springframework.cloudgroupId>
        <artifactId>spring-cloud-starter-securityartifactId>
        <version>2.2.5.RELEASEversion>
    dependency>
    <dependency>
        <groupId>org.springframework.cloudgroupId>
        <artifactId>spring-cloud-starter-oauth2artifactId>
        <version>2.2.5.RELEASEversion>
    dependency>
dependencies>
只需要添加两个配置类即可
@Configuration
@EnableAuthorizationServer
public class MyAuthorizationConfig extends AuthorizationServerConfigurerAdapter {


    /**
     * 客户端存储策略,这里使用内存方式,后续可以存储在数据库
     */
    @Autowired
    private ClientDetailsService clientDetailsService;

    /**
     * Security的认证管理器,密码模式需要用到
     */
    @Autowired
    private AuthenticationManager authenticationManager;

    /**
     * 配置令牌访问的安全约束
     */
    @Override
    public void configure(AuthorizationServerSecurityConfigurer security) throws Exception {
        security
                //开启/oauth/token_key验证端口权限访问
                .tokenKeyAccess("permitAll()")
                //开启/oauth/check_token验证端口认证权限访问
                .checkTokenAccess("permitAll()")
                //表示支持 client_id 和 client_secret 做登录认证
                .allowFormAuthenticationForClients();
    }
    //配置客户端
    @Override
    public void configure(ClientDetailsServiceConfigurer clients) throws Exception {
        //内存模式
        clients.inMemory()
                //客户端id
                .withClient("test")
                //客户端秘钥
                .secret(new BCryptPasswordEncoder().encode("123456"))
                //资源id,唯一,比如订单服务作为一个资源,可以设置多个
                .resourceIds("order")
                //授权模式,总共四种,1. authorization_code(授权码模式)、password(密码模式)、client_credentials(客户端模式)、implicit(简化模式)
                //refresh_token并不是授权模式,
                .authorizedGrantTypes("authorization_code","password","client_credentials","implicit","refresh_token")
                //允许的授权范围,客户端的权限,这里的all只是一种标识,可以自定义,为了后续的资源服务进行权限控制
                .scopes("all")
                //false 则跳转到授权页面
                .autoApprove(false)
                //授权码模式的回调地址
                .redirectUris("http://www.baidu.com"); //可以and继续添加客户端
    }
    /**
     * 令牌存储策略
     */
    @Bean
    public TokenStore tokenStore(){
        return new InMemoryTokenStore();
    }


    @Bean
    public AuthorizationServerTokenServices tokenServices() {
        DefaultTokenServices services = new DefaultTokenServices();
        //客户端端配置策略
        services.setClientDetailsService(clientDetailsService);
        //支持令牌的刷新
        services.setSupportRefreshToken(true);
        //令牌服务
        services.setTokenStore(tokenStore());
        //access_token的过期时间
        services.setAccessTokenValiditySeconds(60 * 60 * 2);
        //refresh_token的过期时间
        services.setRefreshTokenValiditySeconds(60 * 60 * 24 * 3);
        return services;
    }
    /**
     * 授权码模式的service,使用授权码模式authorization_code必须注入
     */
    @Bean
    public AuthorizationCodeServices authorizationCodeServices() {
        //授权码存在内存中
        return new InMemoryAuthorizationCodeServices();
    }

    /**
     * 配置令牌访问的端点
     */
    @Override
    public void configure(AuthorizationServerEndpointsConfigurer endpoints) throws Exception {
        endpoints
                //授权码模式所需要的authorizationCodeServices
                .authorizationCodeServices(authorizationCodeServices())
                //密码模式所需要的authenticationManager
                .authenticationManager(authenticationManager)
                //令牌管理服务,无论哪种模式都需要
                .tokenServices(tokenServices())
                //只允许POST提交访问令牌,uri:/oauth/token
                .allowedTokenEndpointRequestMethods(HttpMethod.POST);
    }
}
@Configuration
@EnableWebSecurity
public class SecurityConfig extends WebSecurityConfigurerAdapter {

    /**
     * 加密算法
     */
    @Bean
    PasswordEncoder passwordEncoder() {
        return new BCryptPasswordEncoder();
    }

    @Override
    protected void configure(HttpSecurity http) throws Exception {
        //todo 允许表单登录
        http.authorizeRequests()
                .anyRequest().authenticated()
                .and()
                .formLogin()
                .loginProcessingUrl("/login")
                .permitAll()
                .and()
                .csrf()
                .disable();
    }

    @Override
    protected void configure(AuthenticationManagerBuilder auth) throws Exception {
        //从内存中加载用户,实际生产中需要从数据库中加载
        auth.inMemoryAuthentication()
                .withUser("admin")
                .password(new BCryptPasswordEncoder().encode("123456"))
                .roles("admin");//后面可以跟and连接
    }


    /**
     * AuthenticationManager对象在OAuth2认证服务中要使用,提前放入IOC容器中
     * Oauth的密码模式需要
     */
    @Override
    @Bean
    public AuthenticationManager authenticationManagerBean() throws Exception {
        return super.authenticationManagerBean();
    }
}
导入依赖和认证中心相同,添加一个配置类
ResourceServerConfig
@Configuration
@EnableResourceServer
public class ResourceServerConfig extends ResourceServerConfigurerAdapter {

    /**
     * 配置令牌校验服务,客户端携带令牌访问资源,作为资源端必须检验令牌的真伪
     * TODO 使用JWT作为TOKEN则不必远程调用check_token校验
     */
    @Bean
    public RemoteTokenServices tokenServices() {
        //远程调用授权服务的check_token进行令牌的校验
        RemoteTokenServices services = new RemoteTokenServices();
        // /oauth/check_token 这个url是认证中心校验的token的端点
        services.setCheckTokenEndpointUrl("http://localhost:8080/oauth/check_token");
        //客户端的唯一id
        services.setClientId("test");
        //客户端的秘钥
        services.setClientSecret("123456");
        return services;
    }

    /**
     * 配置资源id和令牌校验服务
     */
    @Override
    public void configure(ResourceServerSecurityConfigurer resources)  {
        //配置唯一资源id


