MQTT 是当前最主流的物联网通信协议,需要物联网云平台,例如华为云、阿里云、移动 OneNET 都支持 MQTT。而 Hi3861则是一款专为 IoT 应用场景打造的芯片。

图片来自 Pexels
本节主要讲如何在鸿蒙系统中通过移植第 3 方软件包 Paho-MQTT 去实现 MQTT 协议功能,最后会给出测试验证。为后续的物联网项目打好基础。
友情预告,本节内容较多,源码也贴出来了,大家最好先看一遍,然后再操作一次。
相关源码已经打包上传,顺便上传了一个测试 OK 的固件,大家可以直接下载附件直接测试。解压后会得到 5 个压缩包,继续解压即可:
MQTT 全称为 Message Queuing Telemetry
Transport(消息队列遥测传输)是一种基于发布/订阅范式的二进制“轻量级”消息协议,由 IBM 公司发布。针对于网络受限和嵌入式设备而设计的一种数据传输协议。
MQTT 最大优点在于,可以以极少的代码和有限的带宽,为连接远程设备提供实时可靠的消息服务。
作为一种低开销、低带宽占用的即时通讯协议,使其在物联网、小型设备、移动应用等方面有较广泛的应用。

更多 MQTT 协议的介绍见上篇文章:MQTT 协议开发入门。
下载 paho mqtt 软件包,添加到鸿蒙代码中
paho mqtt-c 是基于 C 语言实现的 MQTT 客户端,非常适合用在嵌入式设备上。
https://github.com/eclipse/paho.mqtt.embedded-c
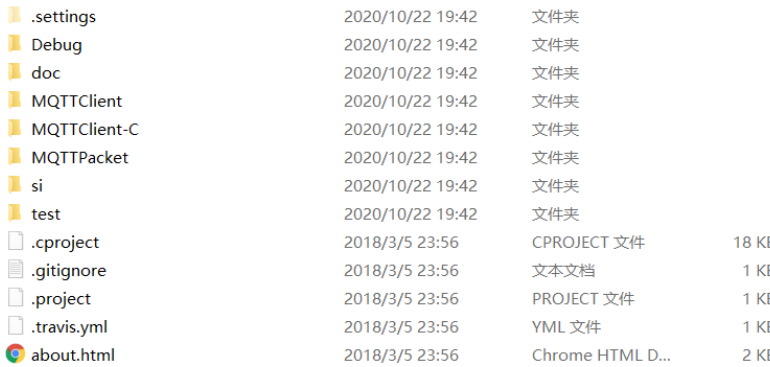
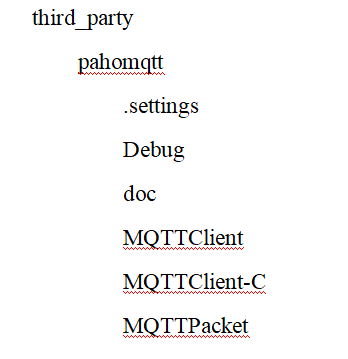
我们在鸿蒙系统源码的 third_party 文件夹下创建一个 pahomqtt 文件夹,然后把解压后的所有文件都拷贝到 pahomqtt 文件夹下。
下一步,我们在 pahomqtt 文件夹下面新建 BUILD.gn 文件,用来构建编译。
# Copyright (c) 2020 Huawei Device Co., Ltd.
# Licensed under the Apache License, Version 2.0 (the "License");
# you may not use this file except in compliance with the License.
# You may obtain a copy of the License at
#
# http://www.apache.org/licenses/LICENSE-2.0
#
# Unless required by applicable law or agreed to in writing, software
# distributed under the License is distributed on an "AS IS" BASIS,
# WITHOUT WARRANTIES OR CONDITIONS OF ANY KIND, either express or implied.
# See the License for the specific language governing permissions and
# limitations under the License.
import("//build/lite/config/component/lite_component.gni")
import("//build/lite/ndk/ndk.gni")
config("pahomqtt_config") {
include_dirs = [
"MQTTPacket/src",
"MQTTPacket/samples",
"//vendor/hisi/hi3861/hi3861/third_party/lwip_sack/include",
"//kernel/liteos_m/components/cmsis/2.0",
]
}
pahomqtt_sources = [
"MQTTPacket/samples/transport.c",
"MQTTPacket/src/MQTTConnectClient.c",
"MQTTPacket/src/MQTTConnectServer.c",
"MQTTPacket/src/MQTTDeserializePublish.c",
"MQTTPacket/src/MQTTFormat.c",
"MQTTPacket/src/MQTTPacket.c",
"MQTTPacket/src/MQTTSerializePublish.c",
"MQTTPacket/src/MQTTSubscribeClient.c",
"MQTTPacket/src/MQTTSubscribeServer.c",
"MQTTPacket/src/MQTTUnsubscribeClient.c",
"MQTTPacket/src/MQTTUnsubscribeServer.c",
]
lite_library("pahomqtt_static") {
target_type = "static_library"
sources = pahomqtt_sources
public_configs = [ ":pahomqtt_config" ]
}
lite_library("pahomqtt_shared") {
target_type = "shared_library"
sources = pahomqtt_sources
public_configs = [ ":pahomqtt_config" ]
}
ndk_lib("pahomqtt_ndk") {
if (board_name != "hi3861v100") {
lib_extension = ".so"
deps = [
":pahomqtt_shared"
]
} else {
deps = [
":pahomqtt_static"
]
}
head_files = [
"//third_party/pahomqtt"
]
}
让 hi3861编译的时候,编译 paho mqtt软件包
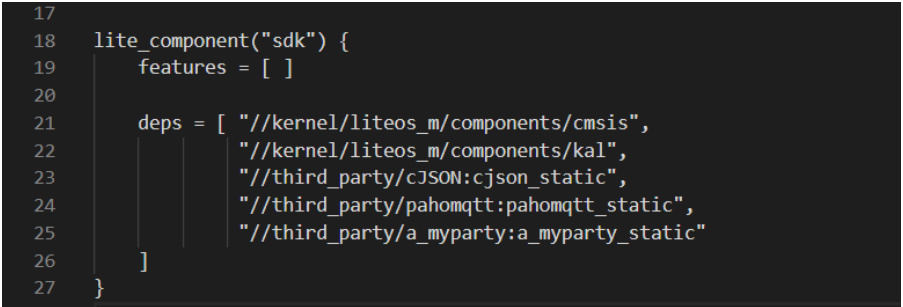
打开 vendor\hisi\hi3861\hi3861\BUILD.gn 文件。
在 lite_component("sdk") 中增加 "//third_party/pahomqtt:pahomqtt_static"。
完成以上修改后,就可以开始编译了,然而很不幸的...你会发现好多编译报错。
不过没事,我们来一个一个解决。
打开 third_party\pahomqtt\MQTTPacket\samples\transport.c 文件,这个文件也是我们主要移植的文件,我们需要实现 socket 相关的操作,包括发送、接收数据。
其实移植就 3 步:
①首先我们导入几个头文件:
#include "lwip/ip_addr.h"
#include "lwip/netifapi.h"

#include "lwip/sockets.h"
②其次修改 transport_sendPacketBuffer 函数,内容修改后如下:
int
transport_sendPacketBuffer(int sock, unsigned char* buf, int buflen)
{
int rc = 0;
rc = send(sock, buf, buflen, 0);
return rc;
}
③后面编译的时候会报错说 close 函数不存在,我们修改 transport_close 函数,修改后内容如下:
int transport_close(int sock)
{
int rc;

    rc = shutdown(sock, SHUT_WR);
    rc = recv(sock, NULL, (size_t)0, 0);
    rc = lwip_close(sock);

    return rc;
}
④修改完 transport.c 文件后,大家编译的时候估计会遇到很多编译错误,都是某个局部变量未使用那种,大家可以修改就行。
类似于这样的,提示 buflen 未使用的错误,大家只需要在代码中随便写个buflen = buflen; 即可。
测试代码比较好写。主要是 3 个文件,内容我都贴出来了:
①BUILD.gn 文件内容
# Copyright (c) 2020 Huawei Device Co., Ltd.
# Licensed under the Apache License, Version 2.0 (the "License");
# you may not use this file except in compliance with the License.
# You may obtain a copy of the License at
#
#     http://www.apache.org/licenses/LICENSE-2.0
#
# Unless required by applicable law or agreed to in writing, software
# distributed under the License is distributed on an "AS IS" BASIS,
# WITHOUT WARRANTIES OR CONDITIONS OF ANY KIND, either express or implied.
# See the License for the specific language governing permissions and
# limitations under the License.

static_library("mqtt_test_at") {
    sources = [
        "mqtt_test.c",
        "at_entry.c"
    ]

    include_dirs = [
        "//utils/native/lite/include",
        "//kernel/liteos_m/components/cmsis/2.0",
        "//base/iot_hardware/interfaces/kits/wifiiot_lite",
        "//vendor/hisi/hi3861/hi3861/third_party/lwip_sack/include",
        "//foundation/communication/interfaces/kits/wifi_lite/wifiservice",
        "//third_party/pahomqtt/MQTTPacket/src",
        "//third_party/pahomqtt/MQTTPacket/samples",
        "//vendor\hisi\hi3861\hi3861\components\at\src"
    ]
}
②at_entry.c 文件主要是注册了一个 AT 指令,后面大家可以使用 AT+MQTTTEST 指令来测试 MQTT 功能
#include
#include
#include "ohos_init.h"
#include
"cmsis_os2.h"
#include
#include
#include
#include "hi_wifi_api.h"
#include "mqtt_test.h"
void mqtt_test_thread(void * argv)
{
argv = argv;
mqtt_test();
}
hi_u32 at_exe_mqtt_test_cmd(void)
{
osThreadAttr_t attr;
attr.name = "wifi_config_thread";
attr.attr_bits = 0U;
attr.cb_mem = NULL;
attr.cb_size = 0U;
attr.stack_mem = NULL;
attr.stack_size = 4096;
attr.priority = 36;
if (osThreadNew((osThreadFunc_t)mqtt_test_thread, NULL, &attr) == NULL) {
printf("[LedExample] Falied to create LedTask!\n");
}
AT_RESPONSE_OK;
return HI_ERR_SUCCESS;
}
const at_cmd_func g_at_mqtt_func_tbl[] = {
{"+MQTTTEST", 9, HI_NULL, HI_NULL, HI_NULL, (at_call_back_func)at_exe_mqtt_test_cmd},
};
void AtExampleEntry(void)
{
hi_at_register_cmd(g_at_mqtt_func_tbl, sizeof(g_at_mqtt_func_tbl)/sizeof(g_at_mqtt_func_tbl[0]));
}
SYS_RUN(AtExampleEntry);
③mqtt_test.c 文件则是编写了一个简单的 MQTT 测试代码,具体代码讲解,后面会重新开一篇
其中测试用的 mqtt 服务器是我自己的服务器:106.13.62.194,大家也可以改成自己的,也可以直接用我个人的 mqtt 服务器。
#include
#include
#include "ohos_init.h"
#include "cmsis_os2.h"
#include
#include "hi_wifi_api.h"
//#include "wifi_sta.h"
#include "lwip/ip_addr.h"
#include "lwip/netifapi.h"
#include "lwip/sockets.h"
#include "MQTTPacket.h"
#include "transport.h"
int toStop = 0;
int mqtt_connect(void)
{
MQTTPacket_connectData data = MQTTPacket_connectData_initializer;
int rc = 0;
int mysock = 0;
unsigned char
buf[200];
int buflen = sizeof(buf);
int msgid = 1;
MQTTString topicString = MQTTString_initializer;
int req_qos = 0;
char* payload = "hello HarmonyOS";
int payloadlen = strlen(payload);
int len = 0;
char *host = "106.13.62.194";
//char *host = "192.168.1.102";
int port = 1883;
mysock = transport_open(host, port);
if(mysock 0)
return mysock;
printf("Sending to hostname %s port %d\n", host, port);
data.clientID.cstring = "me";
data.keepAliveInterval = 20;
data.cleansession = 1;
data.username.cstring = "testuser";
data.password.cstring = "testpassword";
len = MQTTSerialize_connect(buf, buflen, &data);
rc = transport_sendPacketBuffer(mysock, buf, len);
/* wait for connack */
if (MQTTPacket_read(buf, buflen, transport_getdata) == CONNACK)
{
unsigned char sessionPresent, connack_rc;
if (MQTTDeserialize_connack(&sessionPresent, &connack_rc, buf, buflen) != 1 || connack_rc != 0)
{
printf("Unable to connect, return code %d\n", connack_rc);
goto exit;
}
}
else
goto exit;
/* subscribe */
topicString.cstring = "substopic";
len = MQTTSerialize_subscribe(buf, buflen, 0, msgid, 1, &topicString, &req_qos);
rc = transport_sendPacketBuffer(mysock, buf, len);
if (MQTTPacket_read(buf, buflen, transport_getdata) == SUBACK) /* wait for suback */
{
unsigned short submsgid;
int subcount;
int granted_qos;
rc = MQTTDeserialize_suback(&submsgid, 1, &subcount, &granted_qos, buf, buflen);
if (granted_qos != 0)
{
printf("granted qos != 0, %d\n", granted_qos);
goto exit;
}
}
else
goto exit;
/* loop getting msgs on subscribed topic */
topicString.cstring = "pubtopic";
while (!toStop)
{
/* transport_getdata() has a built-in 1 second timeout,
your mileage will vary */
if (MQTTPacket_read(buf, buflen, transport_getdata) == PUBLISH)
{
unsigned char dup;
int qos;
unsigned char retained;
unsigned short msgid;
int payloadlen_in;
unsigned char* payload_in;
int rc;
MQTTString receivedTopic;
rc = MQTTDeserialize_publish(&dup, &qos, &retained, &msgid, &receivedTopic,
&payload_in, &payloadlen_in, buf, buflen);
printf("message arrived %.*s\n", payloadlen_in, payload_in);
rc = rc;
}
printf("publishing reading\n");
len = MQTTSerialize_publish(buf, buflen, 0, 0, 0, 0, topicString, (unsigned char*)payload, payloadlen);
rc = transport_sendPacketBuffer(mysock, buf, len);
}
printf("disconnecting\n");
len = MQTTSerialize_disconnect(buf, buflen);
rc = transport_sendPacketBuffer(mysock, buf, len);
exit
:
transport_close(mysock);
rc = rc;
return 0;
}
void mqtt_test(void)
{
mqtt_connect();
}
#ifndef __MQTT_TEST_H__
#define __MQTT_TEST_H__

void mqtt_test(void);

#endif /* __MQTT_TEST_H__ */
到这里就完成了代码部分,可以开始编译了。
这里我们需要先下载一个 Windows 电脑端的 MQTT 客户端,这样我们就可以用电脑订阅开发板的 MQTT 主题信息了。
https://repo.eclipse.org/content/repositories/paho-releases/org/eclipse/paho/org.eclipse.paho.ui.app/1.1.1/
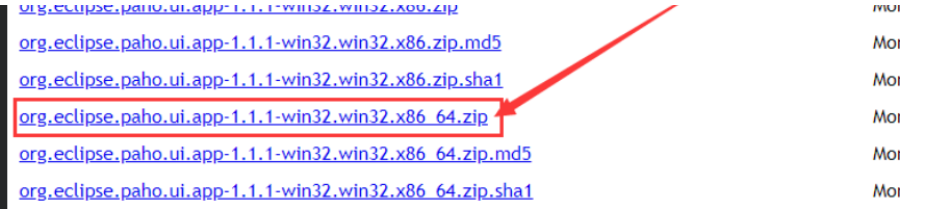
弄完后打开软件,按图操作:
操作完后,我们把编译后程序烧写到开发板,输入如下串口指令,让开发板连接上网络,因为 MQTT 功能需要网络支持。
输入如下串口指令:
AT+STARTSTA                                                       开启STA模式

AT+CONN="12-203",,2,"07686582488"               连接到路由器,注意wifi热点名和密码用自己的

AT+DHCP=wlan0,1                                              获取IP地址

AT+IFCFG                                                             打印查看IP地址
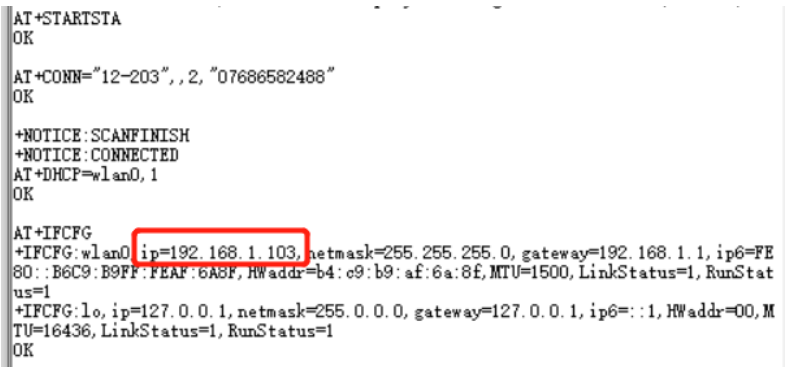
成功连接上路由器后,请确保路由器是可以上网的。然后我们输入我们的 MQTT 测试的 AT 指令:AT+MQTTTEST。
此时我们去查看 我们电脑端的 MQTT 客户端软件,可以看到右边已经有接收 MQTT 信息了,主题未 pubtopic,消息内容为 hello HarmonyOS ! 说明实验成功。
这一次的内容比较多,其中总结起来就 4 步:
-
添加第三方软件包 paho mqtt,关于如何添加第3方软件包,我之前有一篇文章已经讲了。可以参考:如何往鸿蒙系统源码中添加第三方软件包。
-
移植 paho mqtt。
-
编写测试代码,这里我们用的是注册 AT 指令的方式,方便大家使用AT指令测试。
-
测试,这里用电脑装 mqtt 客户端程序,去验证。
👇
扫码关注
HarmonyOS技术社区
👇

专注开源技术,共建鸿蒙生态


